 ReqForge
Documentation
How to get ReqForge running on your machine, how to activate the seat that runs it, and how to use the parts that are not obvious. The application also carries its own guide: press F1 inside it.
What ReqForge is
A desktop API client and test runner: a Tauri v2 shell with a SolidJS front end and a Rust back end. The interface is a web view; everything underneath it, including every byte that goes on the wire, is native Rust.
| Runs on | macOS, Windows, Linux |
|---|---|
| Needs an account | A seat, assigned to your work email address. No password: activation is a six-digit code sent to that address |
| Needs a network | The APIs you are testing, and our licence service once a day. Three weeks of missed checks in a row is what it takes to stop it. See running it offline |
| Stores your work as | One JSON file per collection, in a folder you can back up, diff and commit |
| Sends telemetry | None. No analytics and no crash reporting. It checks your licence once a day and sends nothing else. See privacy |
| Costs | £8 per seat per month, or £50 per seat per year. See pricing |
| HTTP engine | Rust (reqwest over rustls) |
| Scripting | JavaScript, Postman-compatible pm API, in an embedded engine |
| Also ships as | reqforge-cli, a headless binary that runs the same collections in CI |
Installing it
ReqForge is a licensed product. A seat is what lets it put traffic on the wire: sending a request, running a collection, opening a WebSocket or SSE stream, starting the mock server, running a load test and running a security scan. Everything else (opening, editing, importing, exporting, and the git commands) works whatever the licence says. Start a trial and you will be sent a build for each platform your team uses, along with the seat that runs it.
| Platform | What you get | Notes |
|---|---|---|
| macOS 12 or newer | .dmg, Apple silicon and Intel |
Not yet notarised. See the warning below |
| Windows 10 or 11 | .msi installer |
Not yet signed with an EV certificate. See below |
| Linux | .AppImage and .deb |
Needs GTK 3 and WebKitGTK 4.1, which most desktops already have |
| Command line | reqforge-cli, one binary per platform |
The same runs, headless. Which commands need a licence |
Activating your seat
The first time you open ReqForge it asks for the work email address your administrator gave the seat to. Type it, and a six-digit code arrives by email; type that, and the machine is activated.
- Open ReqForge. The activation screen is the first thing it shows.
- Enter your work email address and press Send code.
- Type the six digits from the email. It is good for ten minutes.
- That is it. The app opens, and stays open.
A seat runs on one machine at a time. Moving to a new laptop takes one press: Deactivate this machine in Defaults → Licence on the old one, then activate on the new one. Do it while the old machine is still online, handing the seat back needs the licence service, and a seat released only locally is a seat nobody else can use. If the machine has already gone (lost, wiped, or in a skip), write to us and we release the seat for you.
| What the app says | What it means | What to do |
|---|---|---|
| You do not hold a seat | The address is not assigned to a seat in any organisation | Ask your administrator to assign you one |
| That seat is already active on another machine | One seat, one machine | Deactivate the other machine, or ask for it to be released |
| Offline: ReqForge locks in n days | It has not reached the licence service for a while | Connect to a network for a moment; it refreshes by itself |
| ReqForge is not activated on this machine | There is no licence stored here, or the stored one cannot be read | Defaults → Licence, and activate with your work email |
| Your ReqForge seat was removed | The seat was released or reassigned while this machine was using it | Ask for a seat, then activate again from Defaults → Licence |
| This machine was deactivated by your administrator | The seat is still yours; this particular machine was released | Activate it again from Defaults → Licence |
| The trial has ended | Fourteen days are up, and the app is read-only | Buy seats in the console, or ask us; the same install carries on where it left off |
What activation sends us: your email address, a one-way hash identifying the machine, a label for it (the hostname and the operating system), and the app version. The daily check after that sends the signed licence the app already holds, and the app version. Never your requests, collections, URLs or responses: those stay on your disk. The privacy policy lists it exactly.
Running it offline
ReqForge checks its licence once a day, in the background, and never blocks the interface to do it. The licence it holds is good for seven days; when that runs out a fourteen-day grace period starts, and a banner counts down the days left. So it is three weeks from the last successful check before the app goes read-only, and a moment of network anywhere in that window resets the whole of it. There is nothing to press.
The fourteen days are set per organisation. Longer by design (an air-gapped lab, a customer site with no outbound access) is something we can raise for you: ask. Winding the machine's clock back does not buy any of it: ReqForge remembers the latest moment it has seen and will not believe an earlier one.
Past three weeks, reconnecting is not enough on its own: the licence has gone too stale to refresh, and the app asks you to activate again, the same email address and six-digit code as the first time. The seat is still yours, and nothing you have made is touched.
What a lapsed licence leaves working
Read-only, not shut. Collections, folders, requests, environments, history and saved examples stay open, editable, importable and exportable, and the git commands keep working. Six things stop: sending a request, running a collection, opening a WebSocket or SSE stream, starting the mock server, running a load test, and running a security scan. Nothing of yours is deleted, locked or held back.
On a build agent
reqforge-cli reads a licence token from
REQFORGE_LICENCE_TOKEN, since there is nobody at a
keyboard on a build agent to type a code into an activation screen.
The token is bound to the machine it was issued for, and nothing
issues one for a build agent yet, so an unattended pipeline cannot
hold a seat today. The command line has the detail,
and what runs without a licence in the meantime.
Your first five minutes
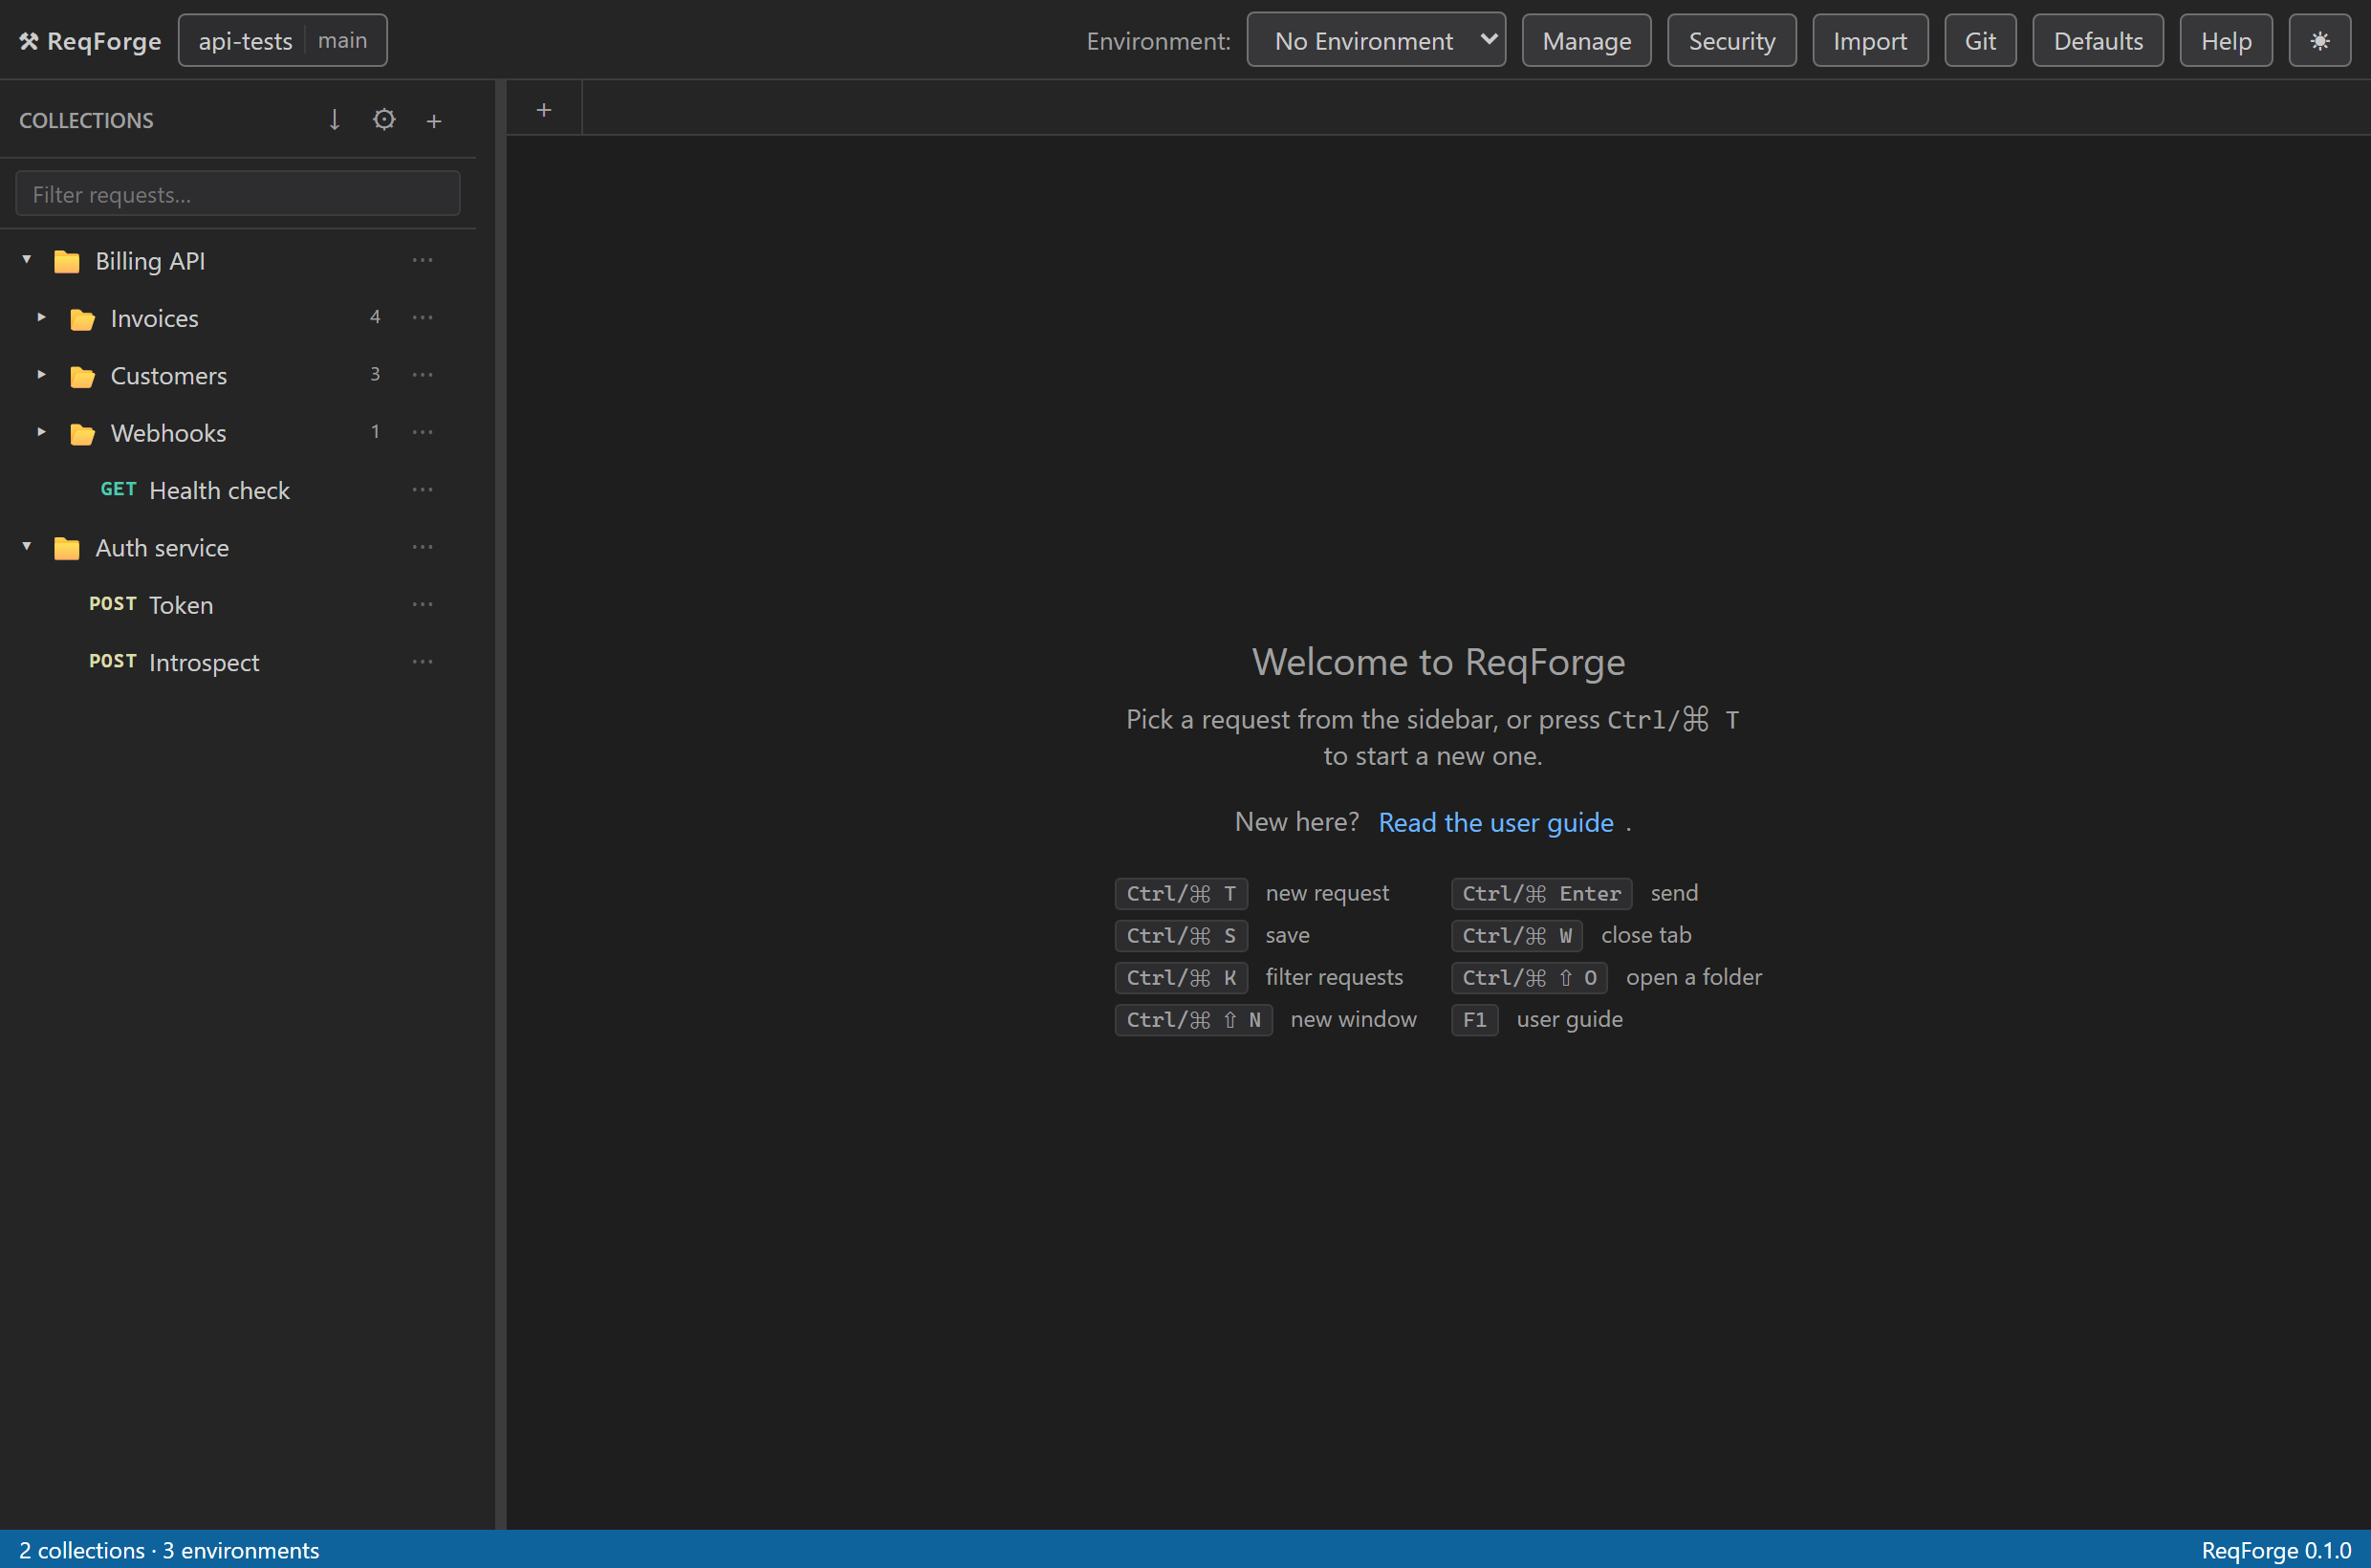
-
Press
Create my first requestin the middle of the window. On a fresh install that makes a collection and a request together. If you already have collections, press+in the Collections header instead. -
Type a URL and pick a method beside it. Try
https://httpbin.org/get. -
Press
Send(Ctrl/⌘+Enter). The response appears with its status, timing and size. -
Make it reusable. Open
Managein the top bar, create an environment calledLocal, addbaseUrl=https://httpbin.org, select it in the top-bar dropdown, and change the URL to{{baseUrl}}/get. Hover the URL to see what it resolves to and where the value came from. -
Assert something. In the Tests tab:
Send again and read the Tests tab in the response panel.pm.test("status is 200", () => { pm.response.to.have.status(200); }); - Run the lot. Press on the collection row in the sidebar to run every request in it.
- Press F1 for the full guide.
Building a request
GET, POST, PUT, PATCH, DELETE, HEAD and OPTIONS. The URL bar and the Params table stay in sync in both directions: edit the query string and the rows follow, edit the rows and the URL follows.
-
Six body modes:
none,raw(JSON, Text, XML, HTML or JavaScript, with syntax highlighting),formdata,urlencoded,binaryandgraphql. -
Bulk edit params and headers as
key: valuelines when a table is slower than typing. - Rows can be disabled rather than deleted, and dragged to reorder.
- An in-flight request can be cancelled instead of waiting out the timeout.
-
Code ▾beside Save copies the request as a cURL command, a JavaScriptfetchcall, or Pythonrequests.
Variables and scopes
Write {{name}} in a URL, param, header, body or auth field
and it is substituted when the request is sent.
{{baseUrl}}/users/{{userId}}?token={{apiKey}}Names resolve from the innermost scope outwards. Where two scopes define the same name, the innermost wins:
Environment (wins)
Folder
Collection
App globals (fallback)
Two things make this usable rather than a guessing game. Typing
{{ offers the names in scope along with what each currently
resolves to and which scope supplies it. And hovering (or tabbing into) any field shows the fully resolved text, the value behind each token, and
which scopes it overrode.
A variable's value may itself contain {{tokens}}, which are
resolved in turn. That is how one collection covers every environment:
the collection owns the shape of the URL, each environment owns only the
piece that changes.
Collection baseUrl = https://{{env}}.api.example.com/v{{version}}
version = 2
Environment env = staging
Request {{baseUrl}}/users -> https://staging.api.example.com/v2/usersEnvironments
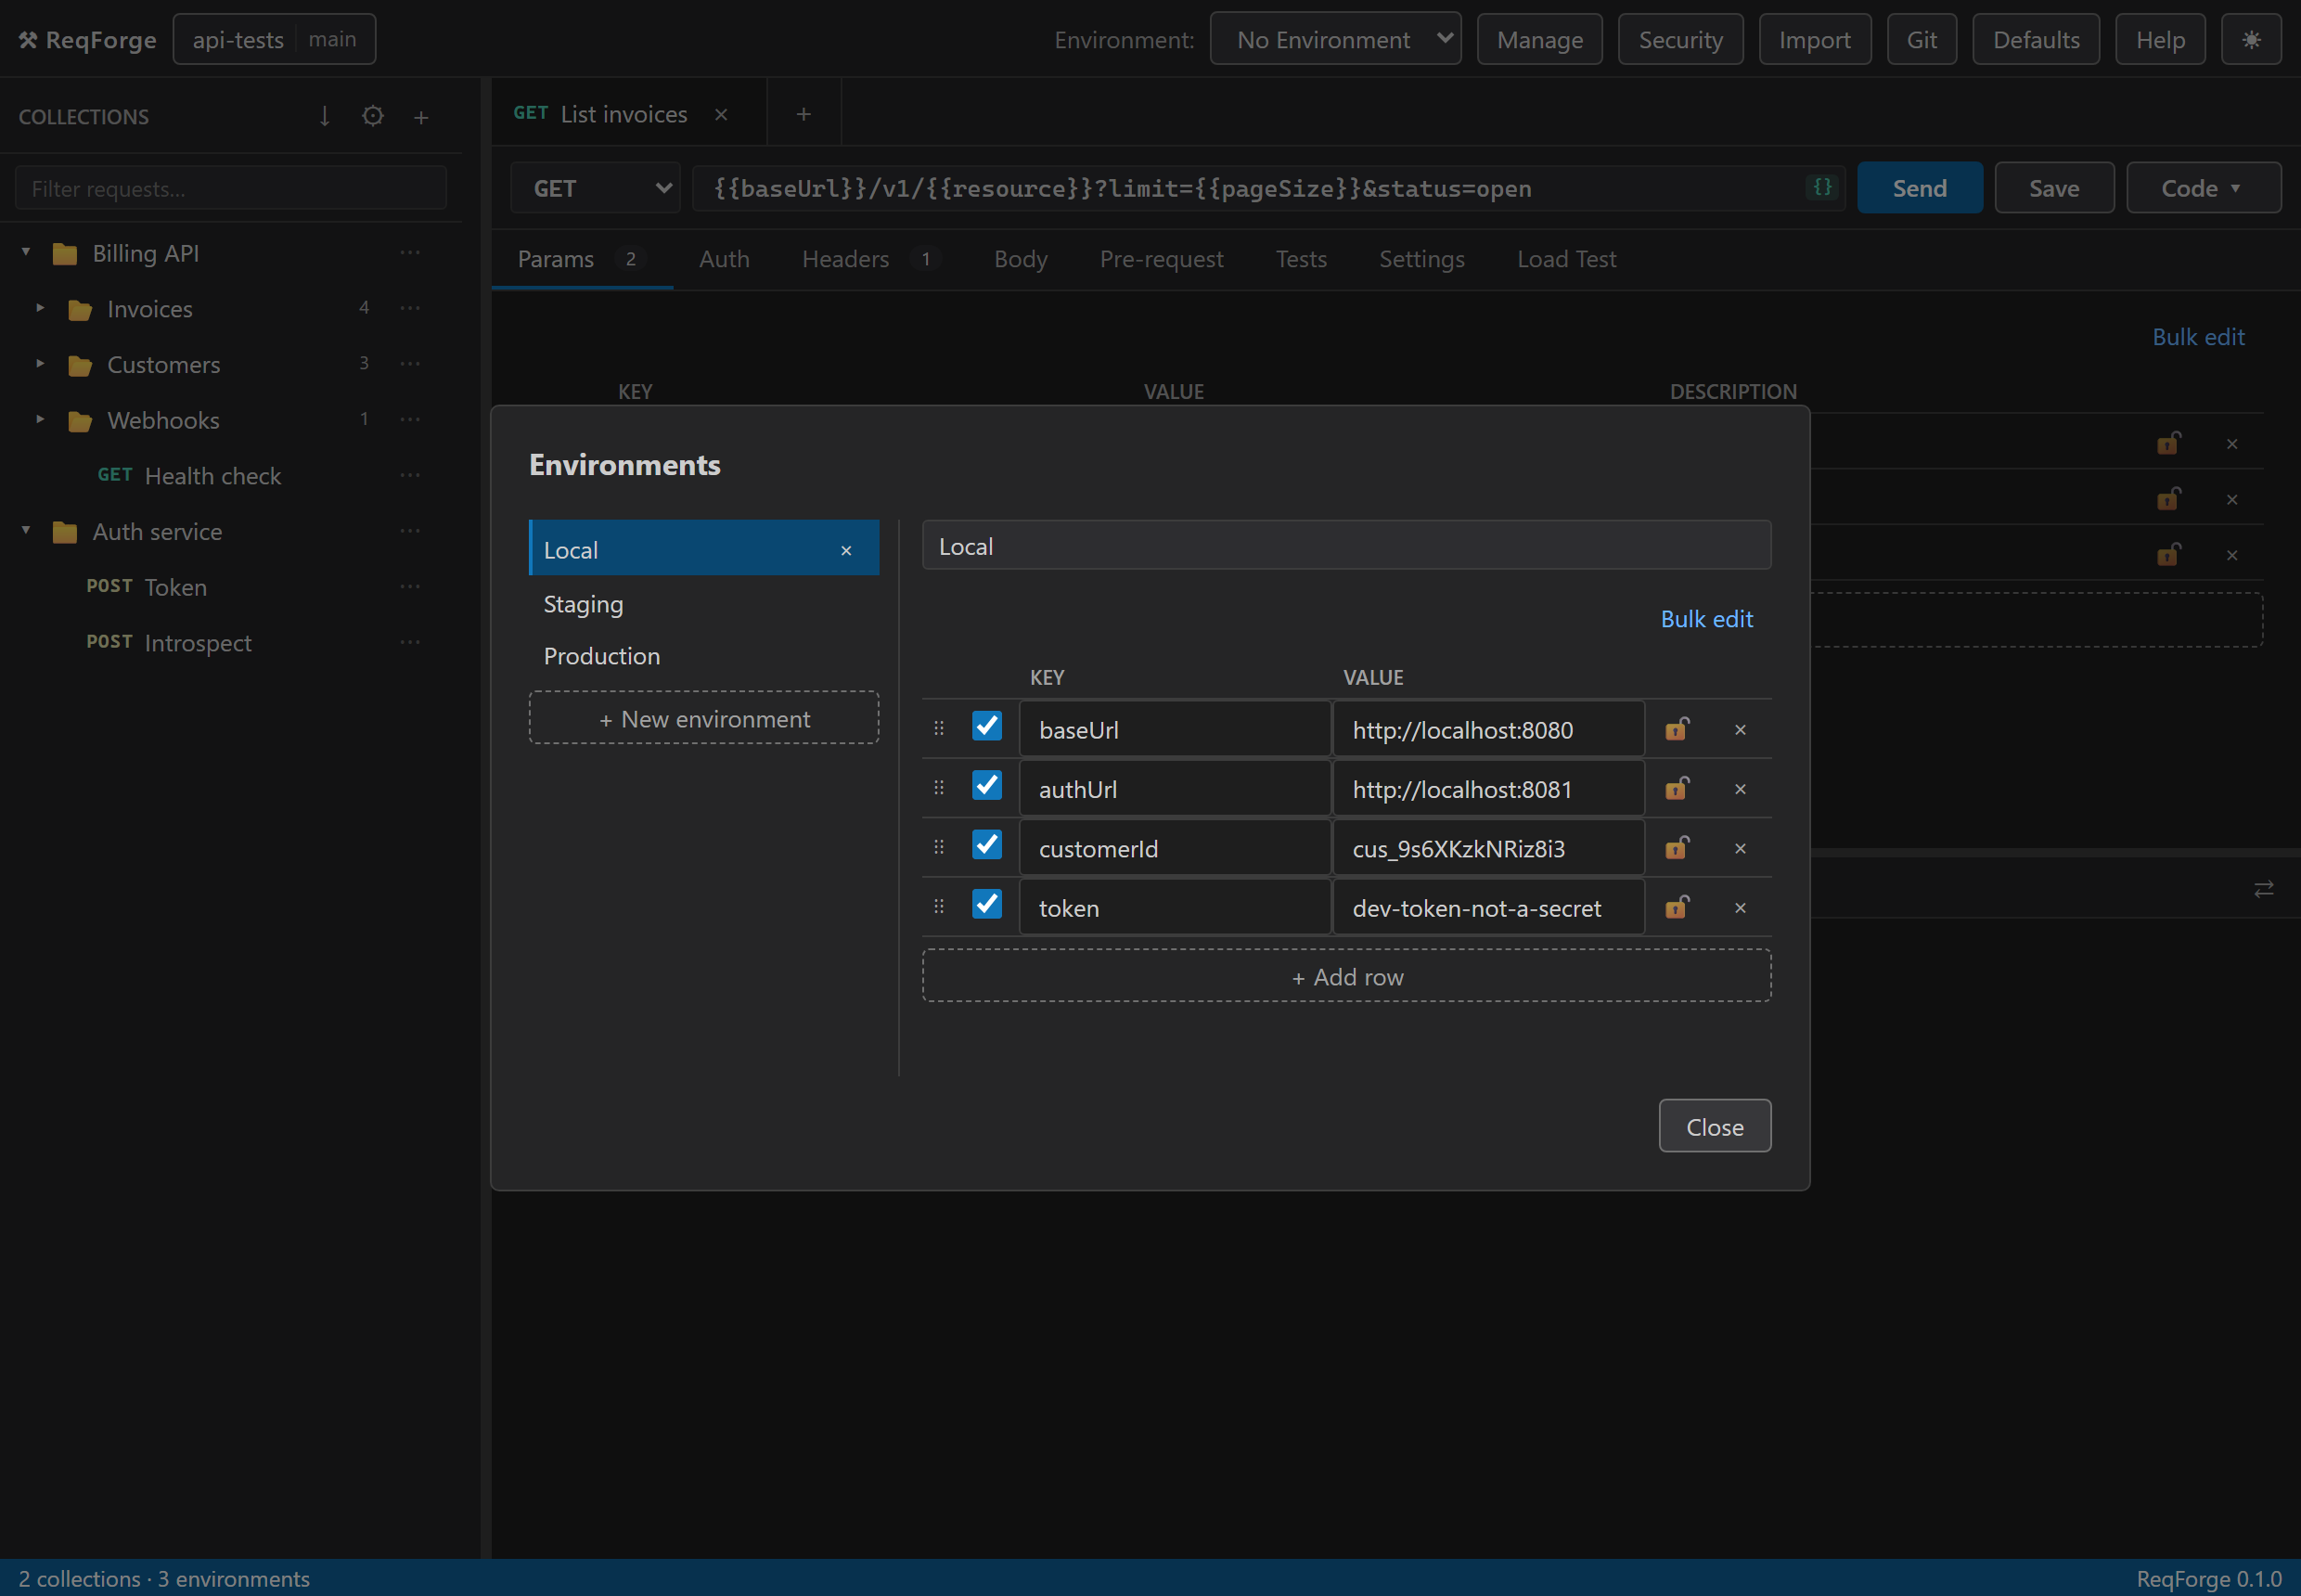
An environment is a named set of variables, one per place you run
against. Pick the active one in the top bar; No Environment
is a valid choice and means only collection, folder and global variables
resolve.
Mark a value secret and it is masked in the interface, kept out of exports unless you explicitly ask for it, and never written to the log. A secret still lives in a plain file on your disk: secrecy here is about not leaking it into an export or a bug report, not encryption at rest.
Inheritance
App defaults, then the collection, then each folder, then the request. Headers, auth, scripts, variables and transport settings all cascade field by field, so a folder can raise a timeout without restating everything else. Each field shows what it inherits and from which level.
The practical effect: set auth once on a collection and every request inside it is authenticated; add a header on a folder and only that folder's requests send it.
Authentication
| Type | Notes |
|---|---|
| Basic | Username and password |
| Bearer | A token, usually from a variable |
| API key | Sent as a header or a query parameter |
| OAuth 2.0 | Client credentials, with the token cached until it expires |
| AWS Signature V4 | Access key, secret, session token, region and service |
Set it on the collection and leave every request on
Inherit, which is the default.
Scripts and tests
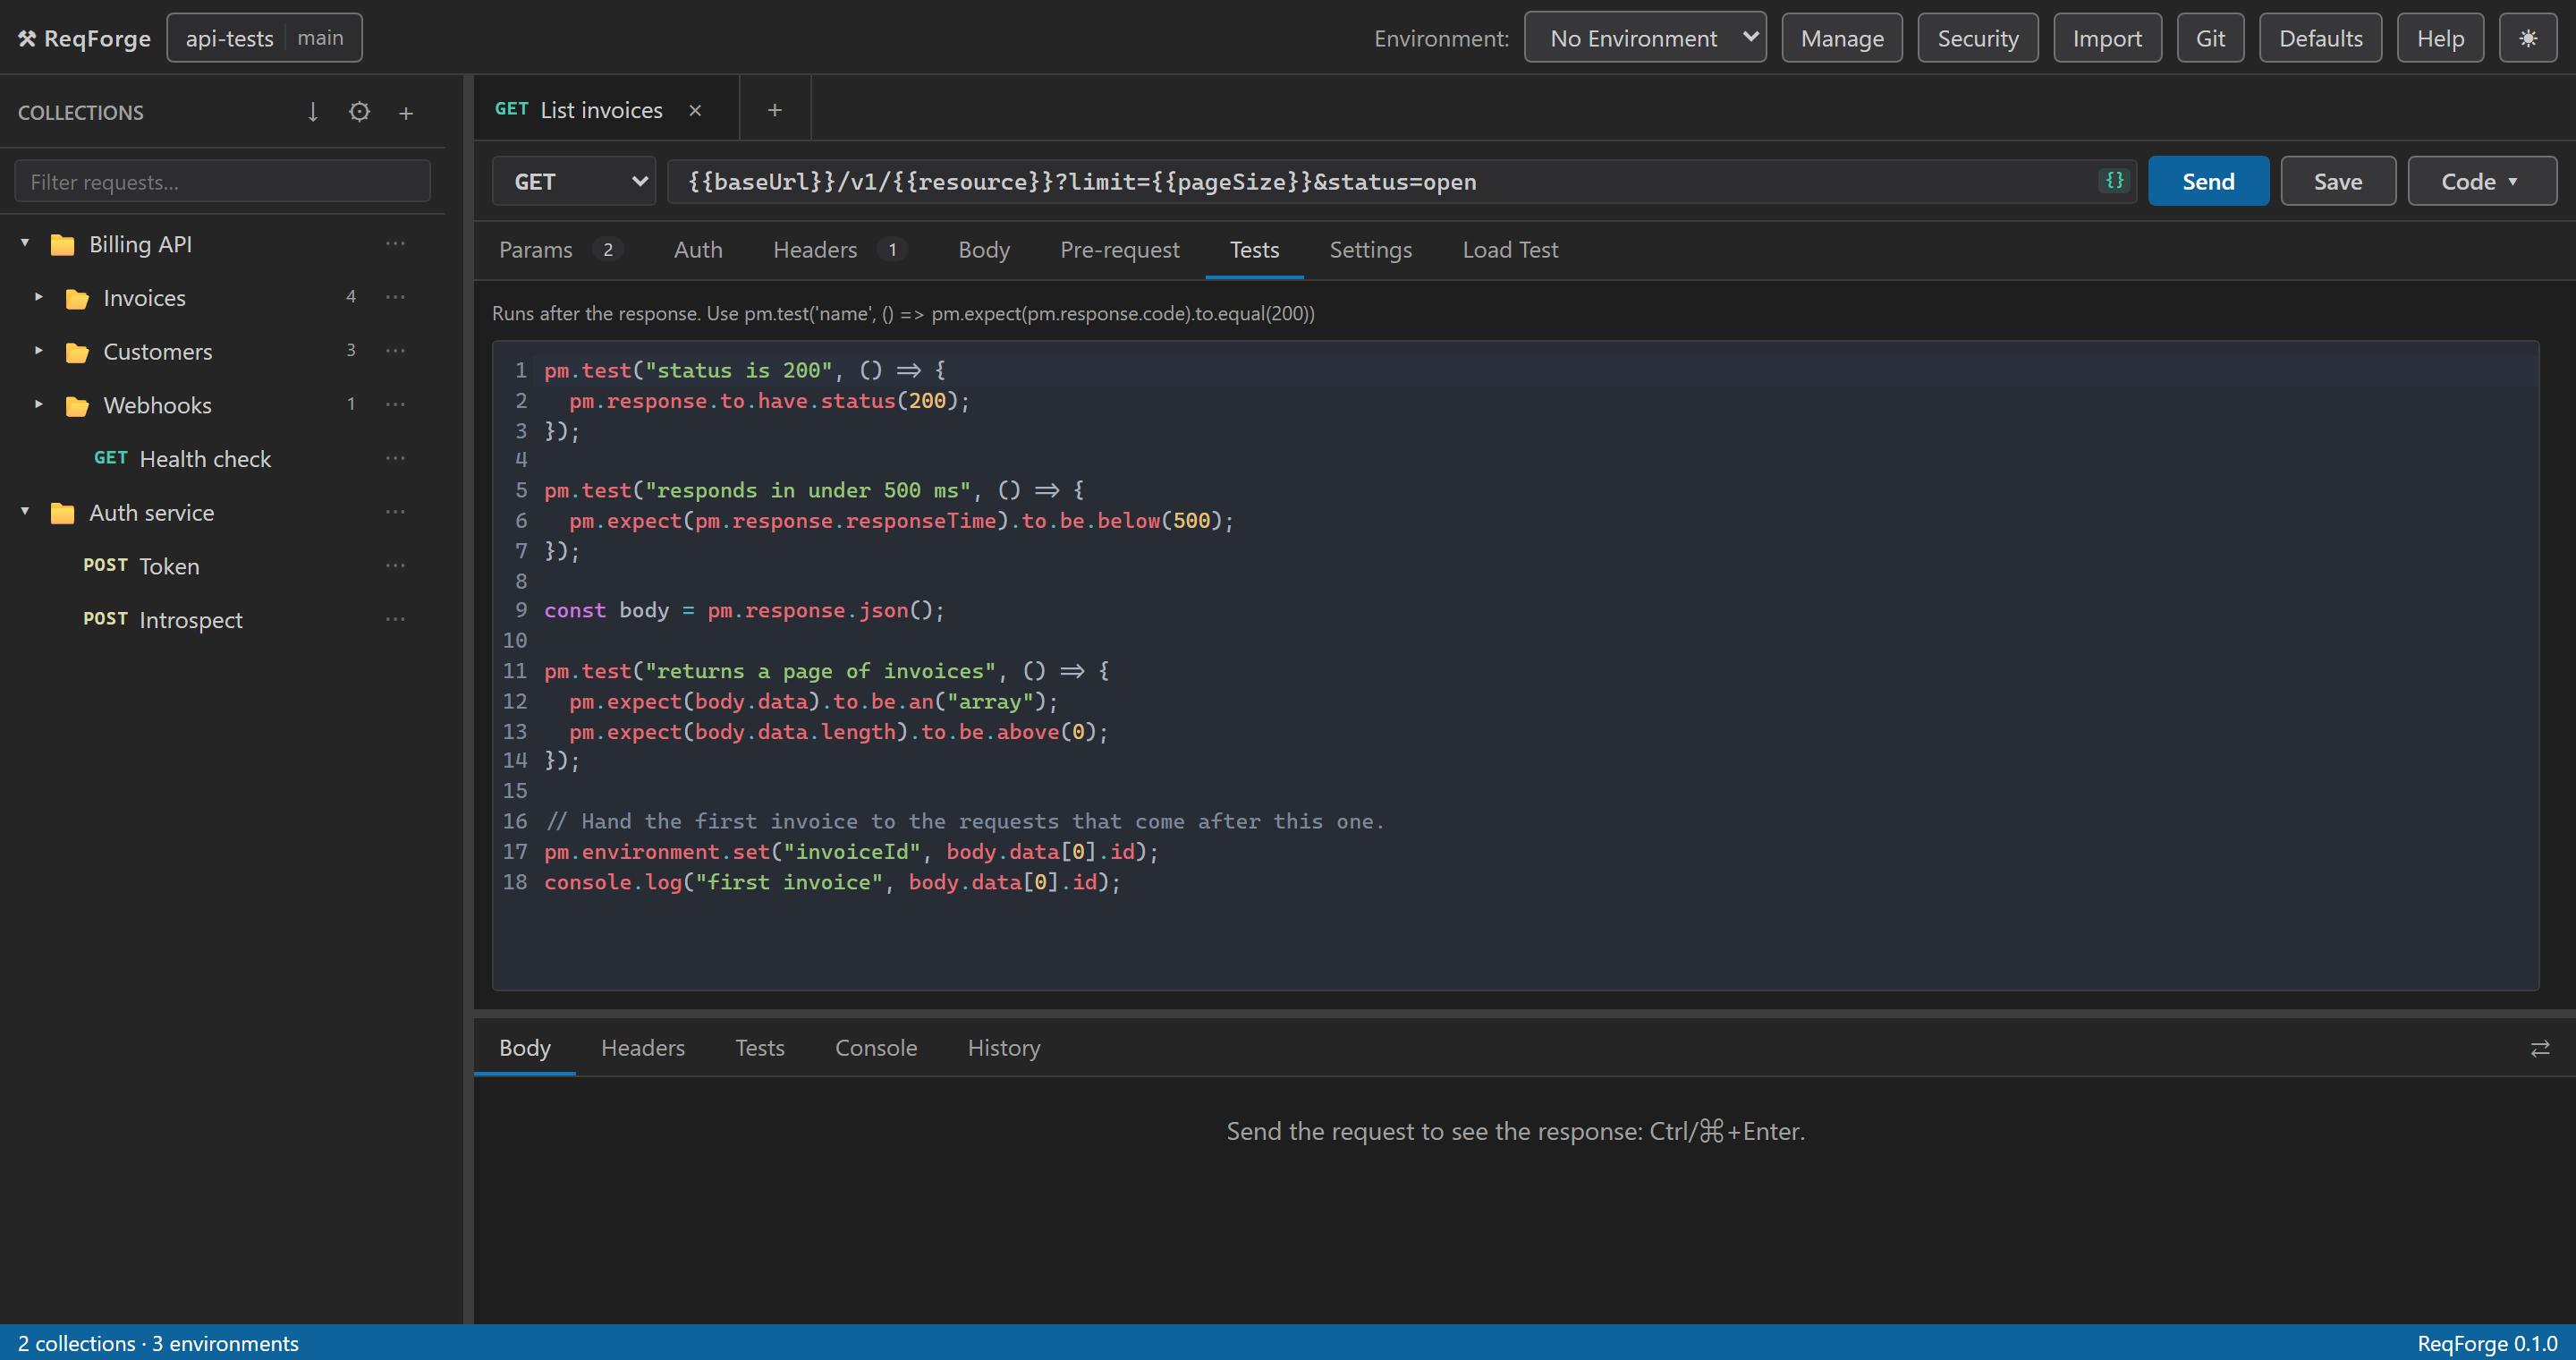
Two scripts per request, both JavaScript with a Postman-compatible
pm API: Pre-request runs before the send,
Tests runs after the response arrives. Both cascade, so
a collection-level script runs for every request inside it.
pm.test("status is 200", () => {
  pm.response.to.have.status(200);
});
const body = pm.response.json();
pm.test("returns a page of invoices", () => {
pm.expect(body.data).to.be.an("array");
pm.expect(body.data.length).to.be.above(0);
});
// Hand the first invoice to the requests that come after this one.
pm.environment.set("invoiceId", body.data[0].id);
console.log("first invoice", body.data[0].id);
pm.sendRequest is available when a call needs a token
first, and pm.iterationData.get() reads the current row when
the CLI is running with a data file. When the response is a page rather
than JSON (a sign-in policy, a SAML post), cheerio.load(pm.response.text())
reads it with the same CSS selectors a Postman collection uses, so the
code on a redirect link or a hidden form field is one
.attr() away. require serves the sandbox
packages a Postman script is written against (lodash,
moment, crypto-js, uuid,
chai, ajv, tv4,
xml2js, csv-parse and the Node modules
beside them, so an imported collection's scripts run unedited.
Scripts run in an embedded engine with time limits, so a runaway loop
cannot hang the app.
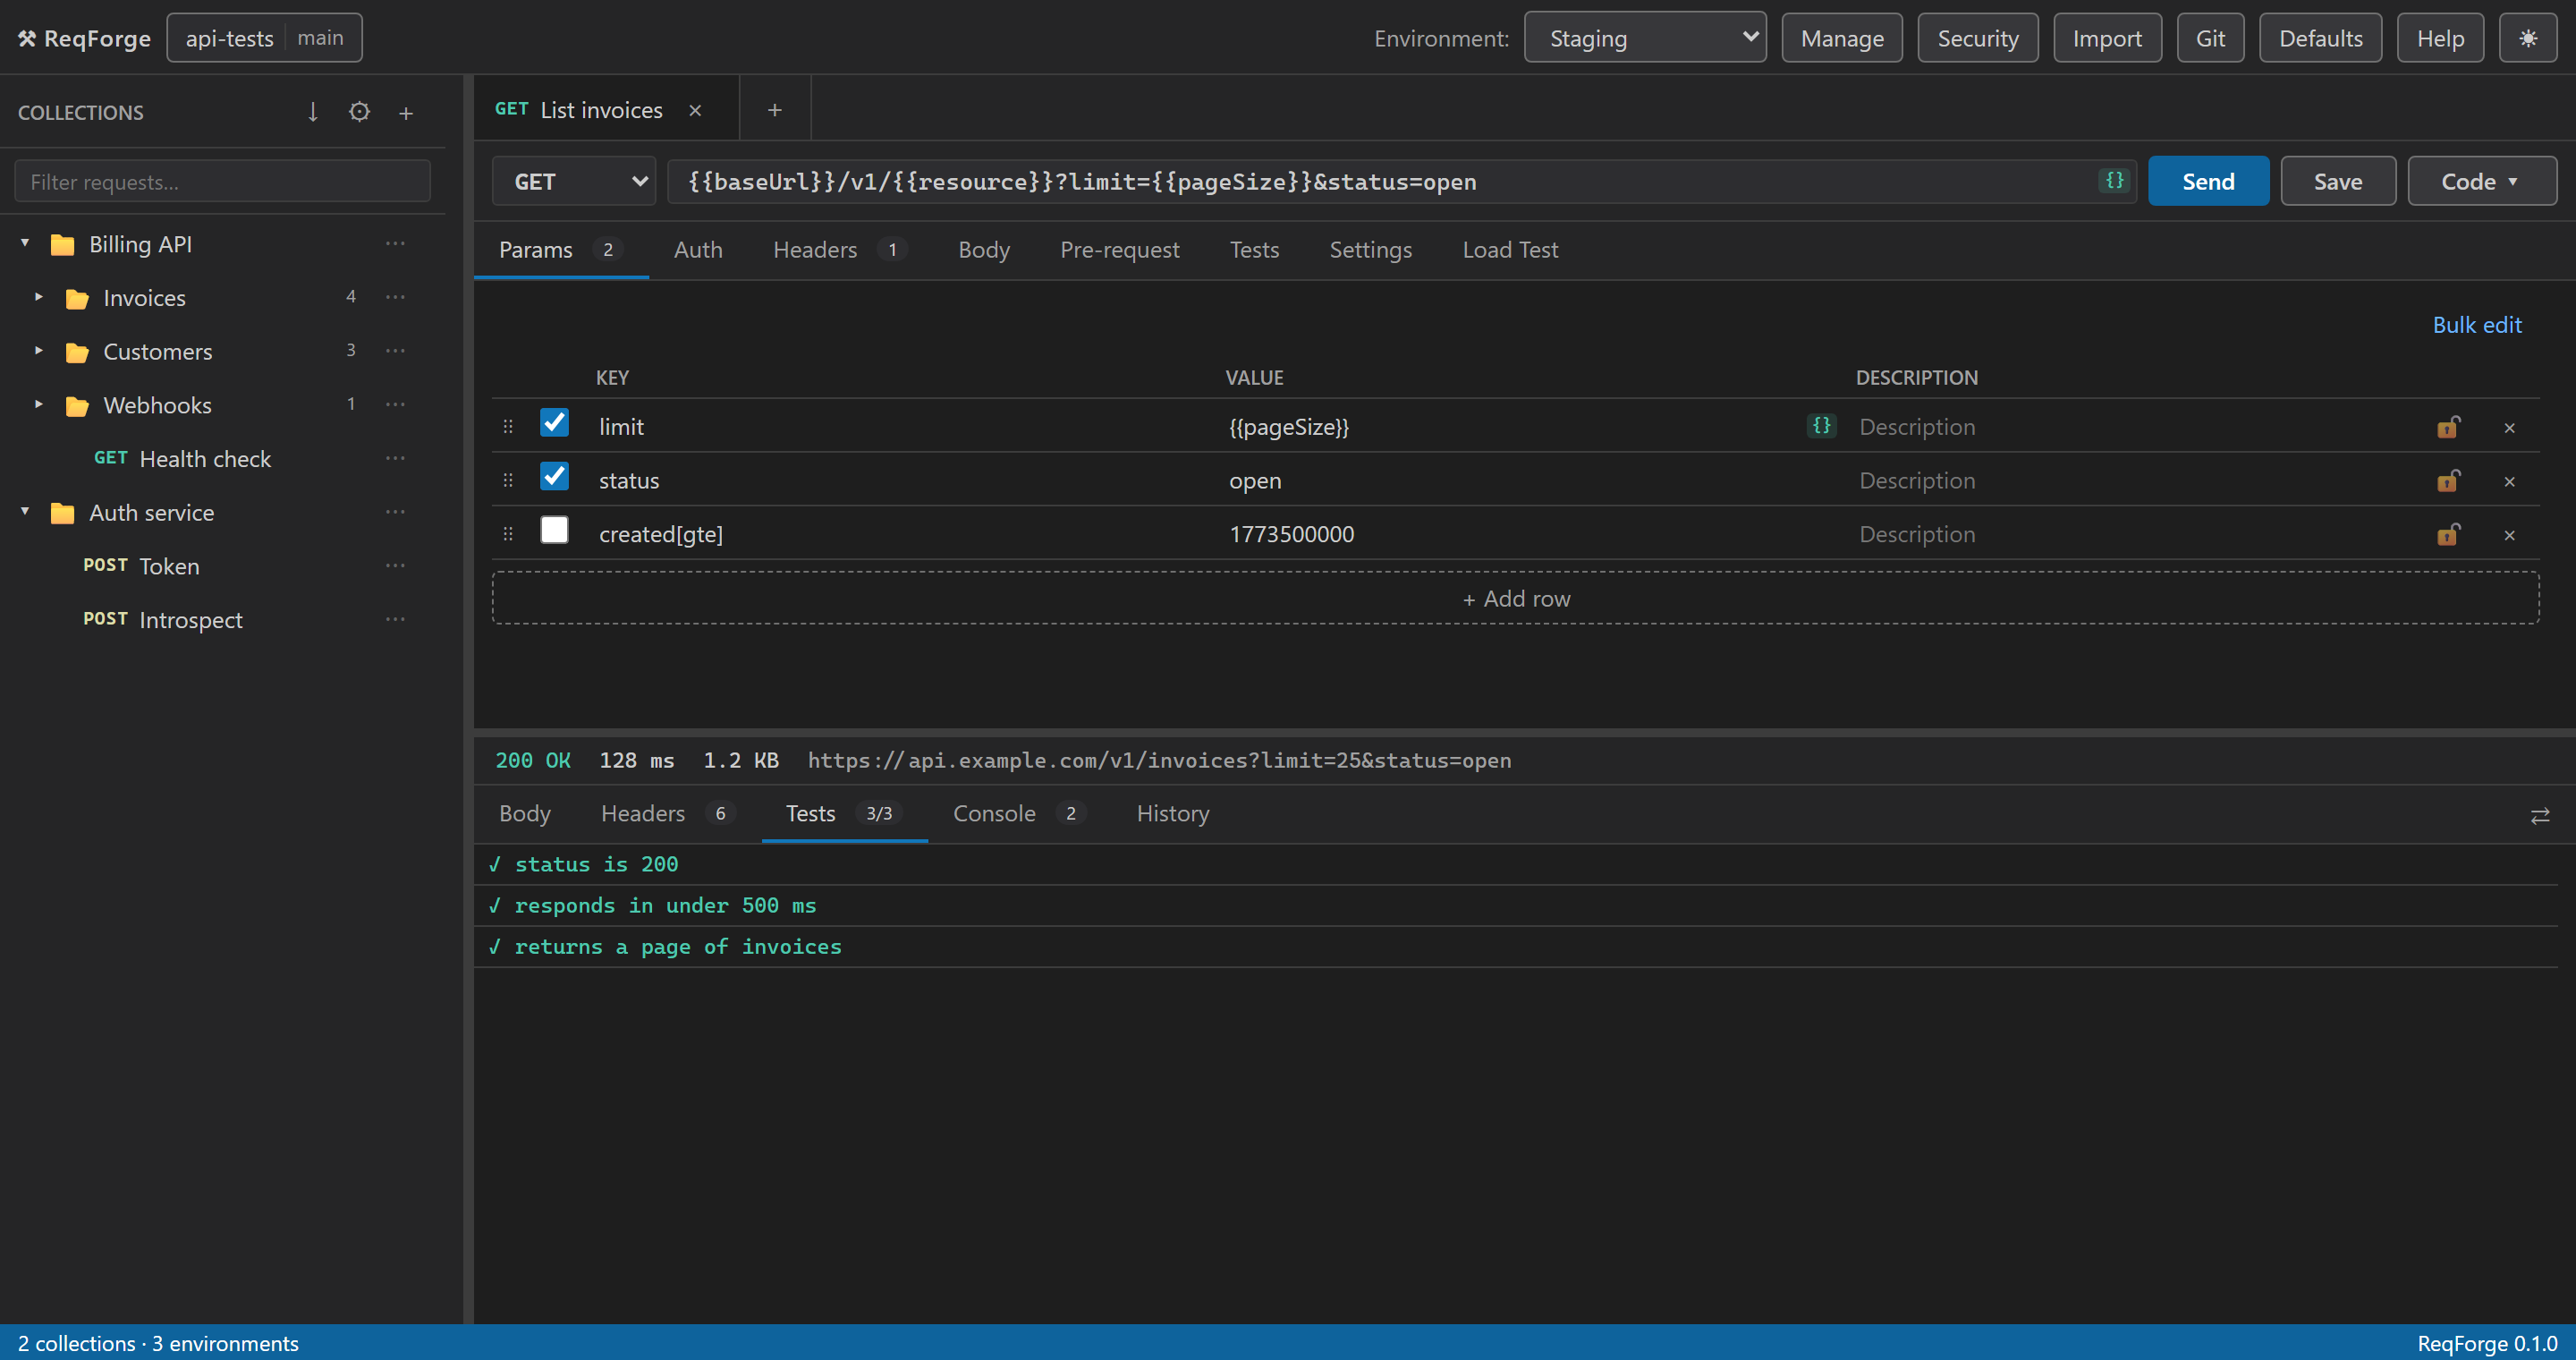
Reading responses
- Pretty, Raw and Preview views, with live search and a match count.
- Prettify for servers that mislabel JSON as
text/plain. - Redirect chains hop by hop, with what changed on each hop.
- A console showing exactly what was sent, recorded even when the request failed.
- Per-request history you can click to replay.
-
WebSockets and SSE in the Stream tab:
ws://,wss://and Server-Sent Events render as a timestamped conversation, with binary frames decoded to text when they are text and hex-dumped when they are not.
Running a collection
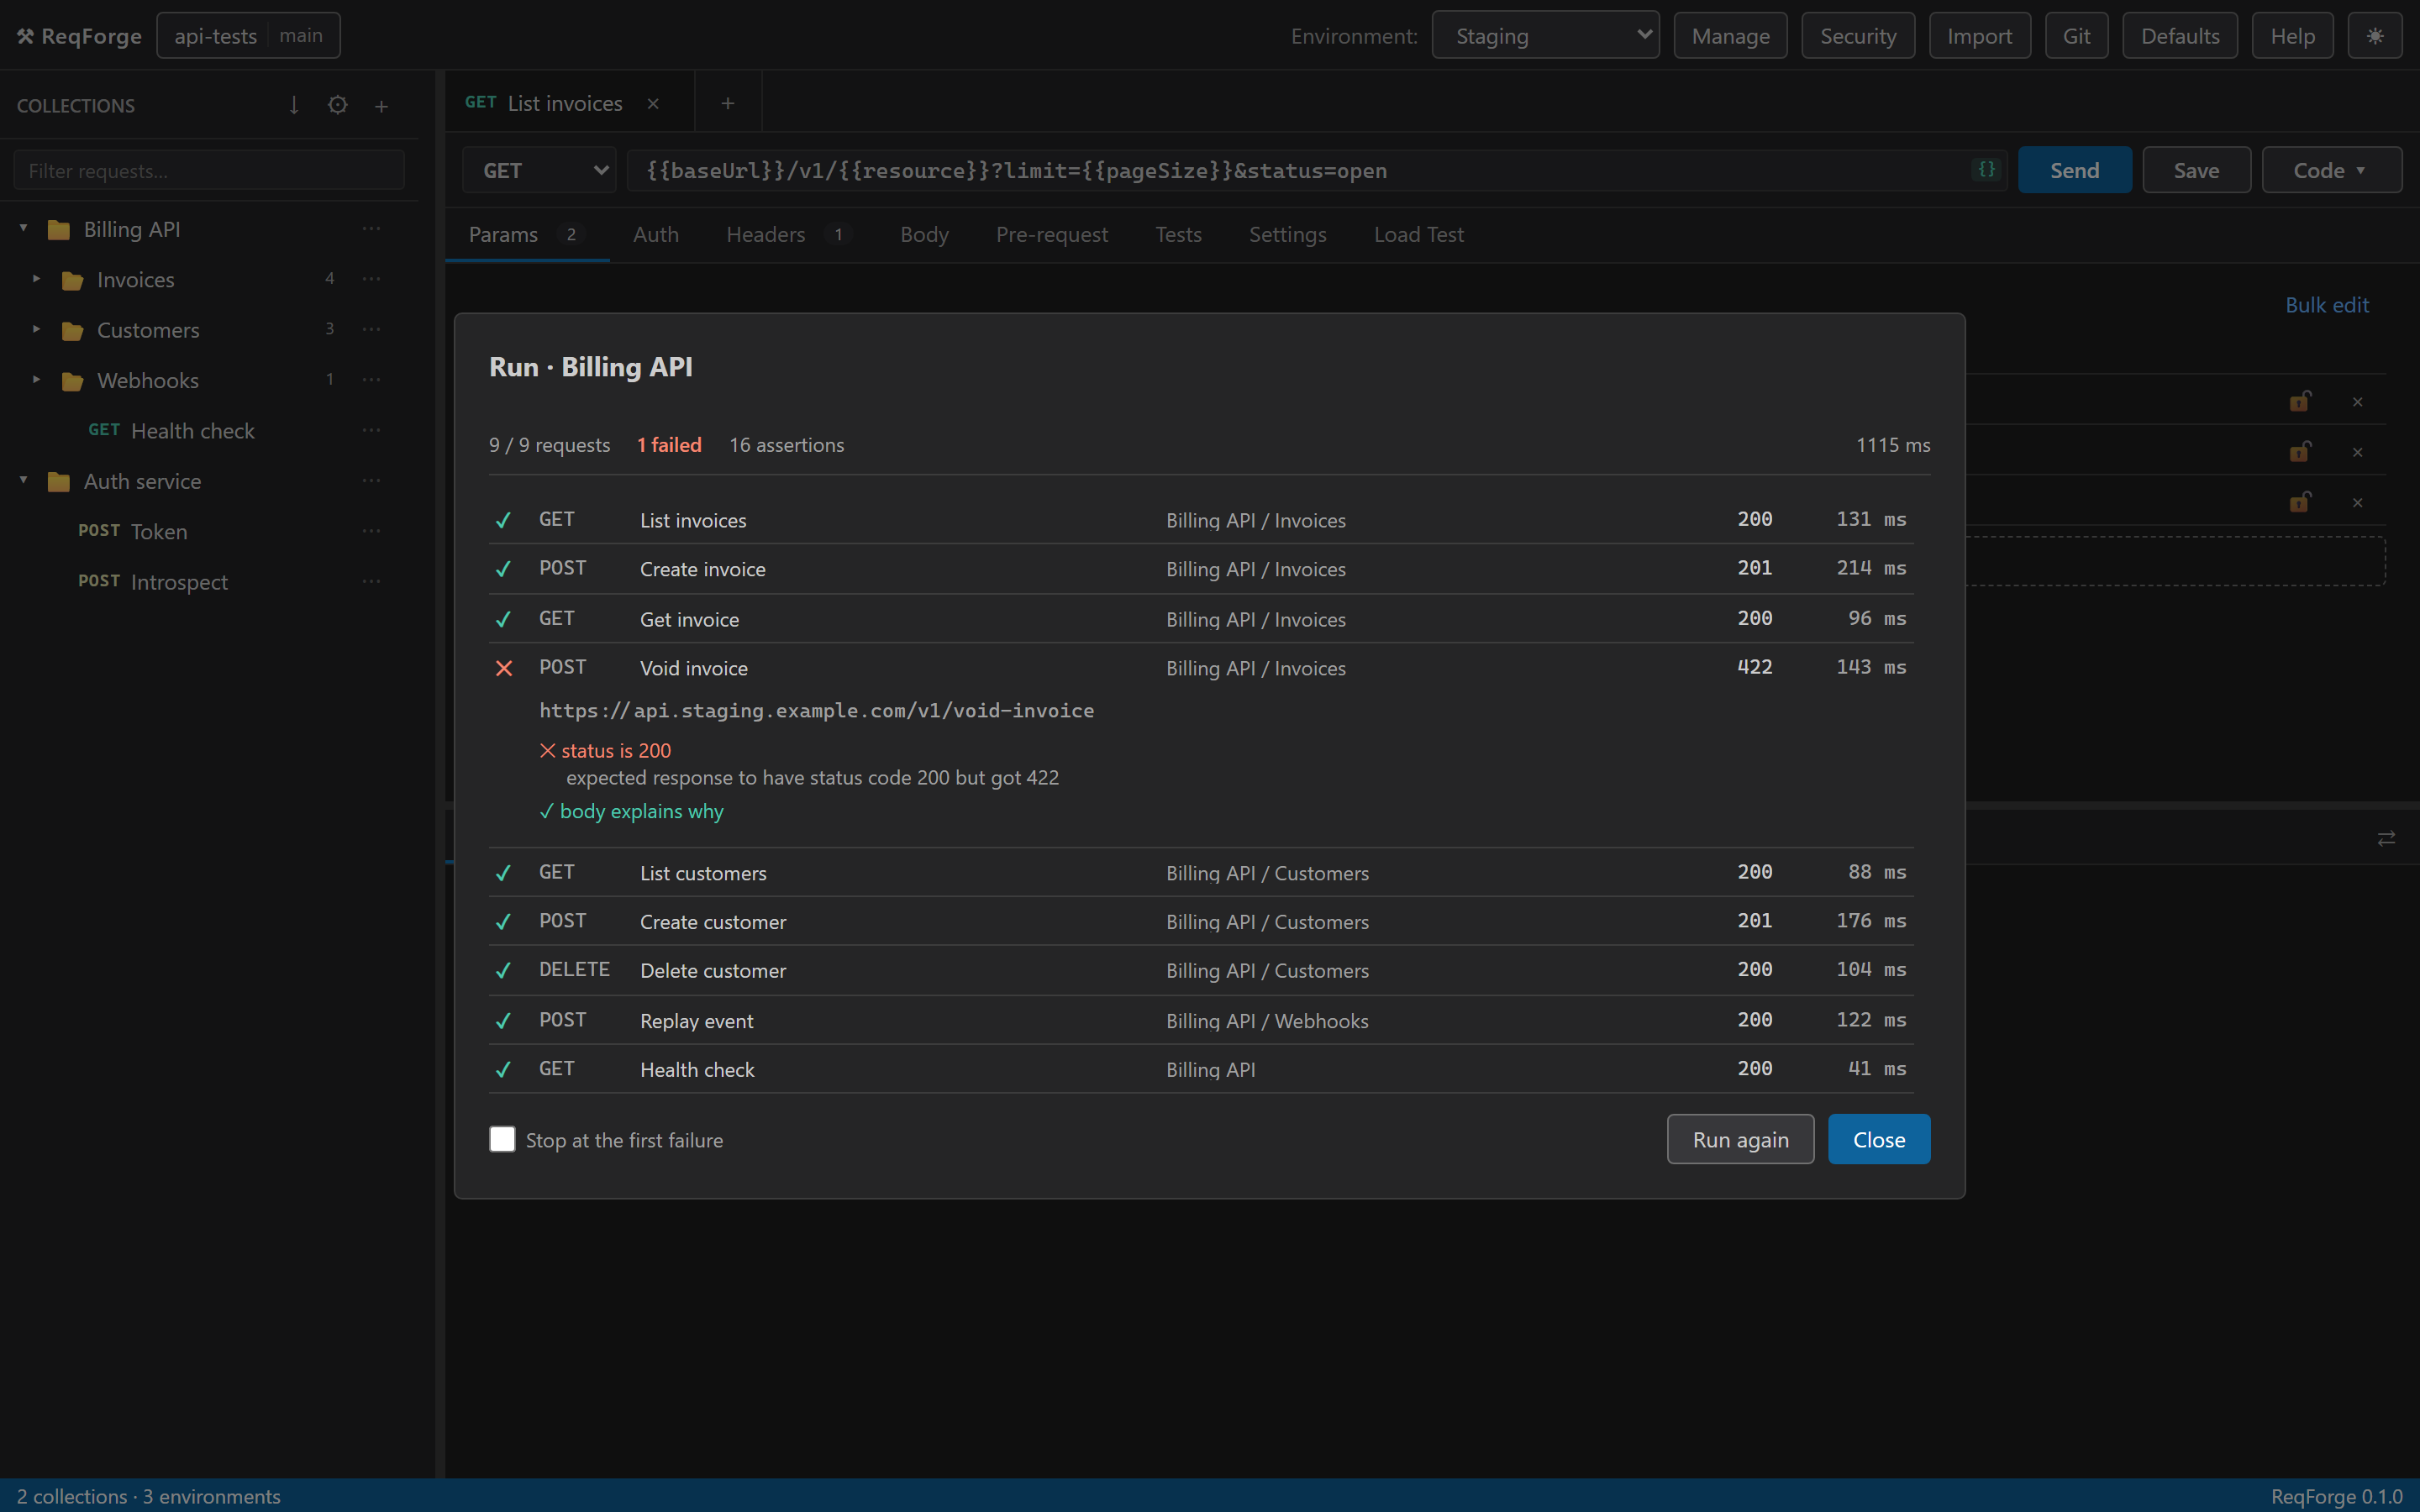
Press on a collection or folder row.
Requests run in tree order, results stream in as they finish, and each
row expands to the URL that was reached, the assertions and any error.
Stop at the first failure ends the run on the first failing
request. There is an inter-request delay for APIs that rate-limit.
The runner, the Send button and reqforge-cli all call the
same execution core, so a run in CI cannot behave differently from a run
at your desk.
The command line
reqforge-cli runs collections headlessly, through the same
engine: same variables, same scripts, same settings, same cascade. Its
option surface mirrors Newman's and it reads the same files, so an
existing pipeline usually only needs the command name changed.
$ reqforge-cli run ./billing.postman_collection.json

ReqForge · Billing API · 3 request(s)

Billing API / Invoices / List invoices GET http://127.0.0.1:8099/v1/invoices
  200 OK · 3 ms · 123 B
  ✓ status is 200
  ✓ returns a page of invoices

Billing API / Invoices / Create invoice POST http://127.0.0.1:8099/v1/invoices
  201 Created · 1 ms · 30 B
  ✓ status is 201

Billing API / Health check GET http://127.0.0.1:8099/healthz
  200 OK · 0 ms · 55 B
  ✓ status is 200
  ✓ every dependency is up

3 request(s) · 0 failed · 5 assertion(s) · 0 failed · 46 ms
Commands
| Command | What it does |
|---|---|
run <collection> | Run a collection, a folder, or a single request. Needs a licence |
diagnose <url> | Check the connection to a URL: DNS, TCP, TLS and one HTTP round trip, separately. Needs a licence |
list [what] | collections, environments, or requests <collection> |
logs | Print the log file path, or its tail with --tail N |
doctor | Paths, versions, counts and tool availability in one block |
help / version | What they say |
run and diagnose put traffic on the wire, so
they need a seat: the app's activation on the same machine, or a
licence token in REQFORGE_LICENCE_TOKEN.
list, logs, doctor,
help and version do not: an install can
always be diagnosed, which is exactly when you need it.
What the arguments accept
Format is decided by the content, not the file name, so the same command
works whichever tool produced the file. A file the Postman API wrapped in
a collection or environment key is unwrapped on
the way in.
| Argument | Accepts |
|---|---|
<collection> | A ReqForge or Postman v2.x collection file, or the name or id of a collection in this workspace |
-e, --environment | A ReqForge or Postman environment file, or the name of an environment in this workspace |
-g, --globals | A ReqForge environment or Postman globals file |
-d, --iteration-data | A CSV whose first row names the columns, or a JSON array of objects |
Run options
| Flag | Meaning |
|---|---|
-e, --environment <name|file> | Activate an environment |
-g, --globals <file> | Global variables, the outermost layer |
-d, --iteration-data <file> | Run once per row, binding that row's columns as variables |
-n, --iteration-count <n> | Run the selection this many times |
--folder <name> | Only run this folder (Name or Parent/Child). Repeatable |
--request <name> | Only run requests matching this. Repeatable |
--env-var <key=value> | Set a variable above the environment. Repeatable |
--global-var <key=value> | Set a variable at the globals layer. Repeatable |
-r, --reporters <list> | cli (default), json, junit, comma separated |
--reporter-json-export <file> | Where the json reporter writes |
--reporter-junit-export <file> | Where the junit reporter writes |
-o, --output <file> | Where to write, when exactly one reporter produces a file |
--timeout-request <ms> | Override the request timeout for this run |
--delay-request <ms> | Wait between requests |
-k, --insecure | Skip TLS certificate verification |
--ignore-redirects | Do not follow redirects |
--bail | Stop at the first failing request |
-x, --suppress-exit-code | Exit 0 even when something failed |
--color <on|off|auto> | Colour the cli reporter |
--silent | Print nothing; file reporters still write |
--verbose | Print the request as sent, redirect hops, bodies, script logs |
--data-dir <path> | Where this workspace's collections and environments live |
The pre-Newman spellings (--env, --var,
--timeout, --delay, --reporter and
--no-color) still work.
Diagnose options
| Flag | Meaning |
|---|---|
-k, --insecure | Skip TLS certificate verification |
--proxy <url> | Go through this proxy instead of the default |
--timeout <ms> | Cap the HTTP round trip (default 30000) |
--json | Print the whole diagnosis as JSON |
diagnose sends none of your request: no headers, no
auth, no body. It exits 0 when every check passes and
1 when one fails, so "it does not work" becomes "the name
does not resolve on this machine" or "the port is closed".
Exit codes
| Code | Meaning |
|---|---|
0 | Everything passed |
1 | A request failed, or an assertion failed |
2 | Bad usage, or a file or collection that could not be read |
Examples
reqforge-cli doctor
reqforge-cli list collections
reqforge-cli run ./api.postman_collection.json -e ./staging.postman_environment.json
reqforge-cli run "My API" --folder Users --bail
reqforge-cli run "My API" -d users.csv --delay-request 200
reqforge-cli run "My API" -r cli,junit --reporter-junit-export results.xml
reqforge-cli diagnose https://api.example.com/v1/users
reqforge-cli logs --tail 100
In CI
run and
diagnose verify a licence token from
REQFORGE_LICENCE_TOKEN, and that token is bound to one
machine: the CLI checks it against the agent it is running on and
refuses a token issued for anywhere else. Nothing issues a token for a
build agent today, so a pipeline cannot hold a seat yet. Issuing them
is being built; tell us if it is what would
decide it for you, because that changes what gets done first. The rest
of this section is what a pipeline will look like, and is here so you
can see whether it fits yours.
Point REQFORGE_DATA_DIR at a throwaway directory, or hand
the CLI an exported collection file and skip the data directory
altogether. Keep the token in your CI secret store and nowhere else.
# .github/workflows/api-tests.yml
name: API tests
on: [push]

env:
  REQFORGE_LICENCE_TOKEN: ${{ secrets.REQFORGE_LICENCE_TOKEN }}

jobs:
  api:
    runs-on: ubuntu-latest
    steps:
      - uses: actions/checkout@v4

      - name: Run the collection
        run: |
          reqforge-cli \
            run ./tests/api.postman_collection.json \
            -e ./tests/staging.postman_environment.json \
            -r cli,junit --reporter-junit-export results.xml

      - uses: actions/upload-artifact@v4
        if: always()
        with:
          name: api-test-results
          path: results.xml
The job fails on exit code 1, which covers both a request
that errored and an assertion that did not hold. Add
--verbose when a CI-only failure needs diagnosing, or read
reqforge-cli logs --tail 200.
Copy CLI command button that writes the exact
invocation for that scope to your clipboard.
Load testing
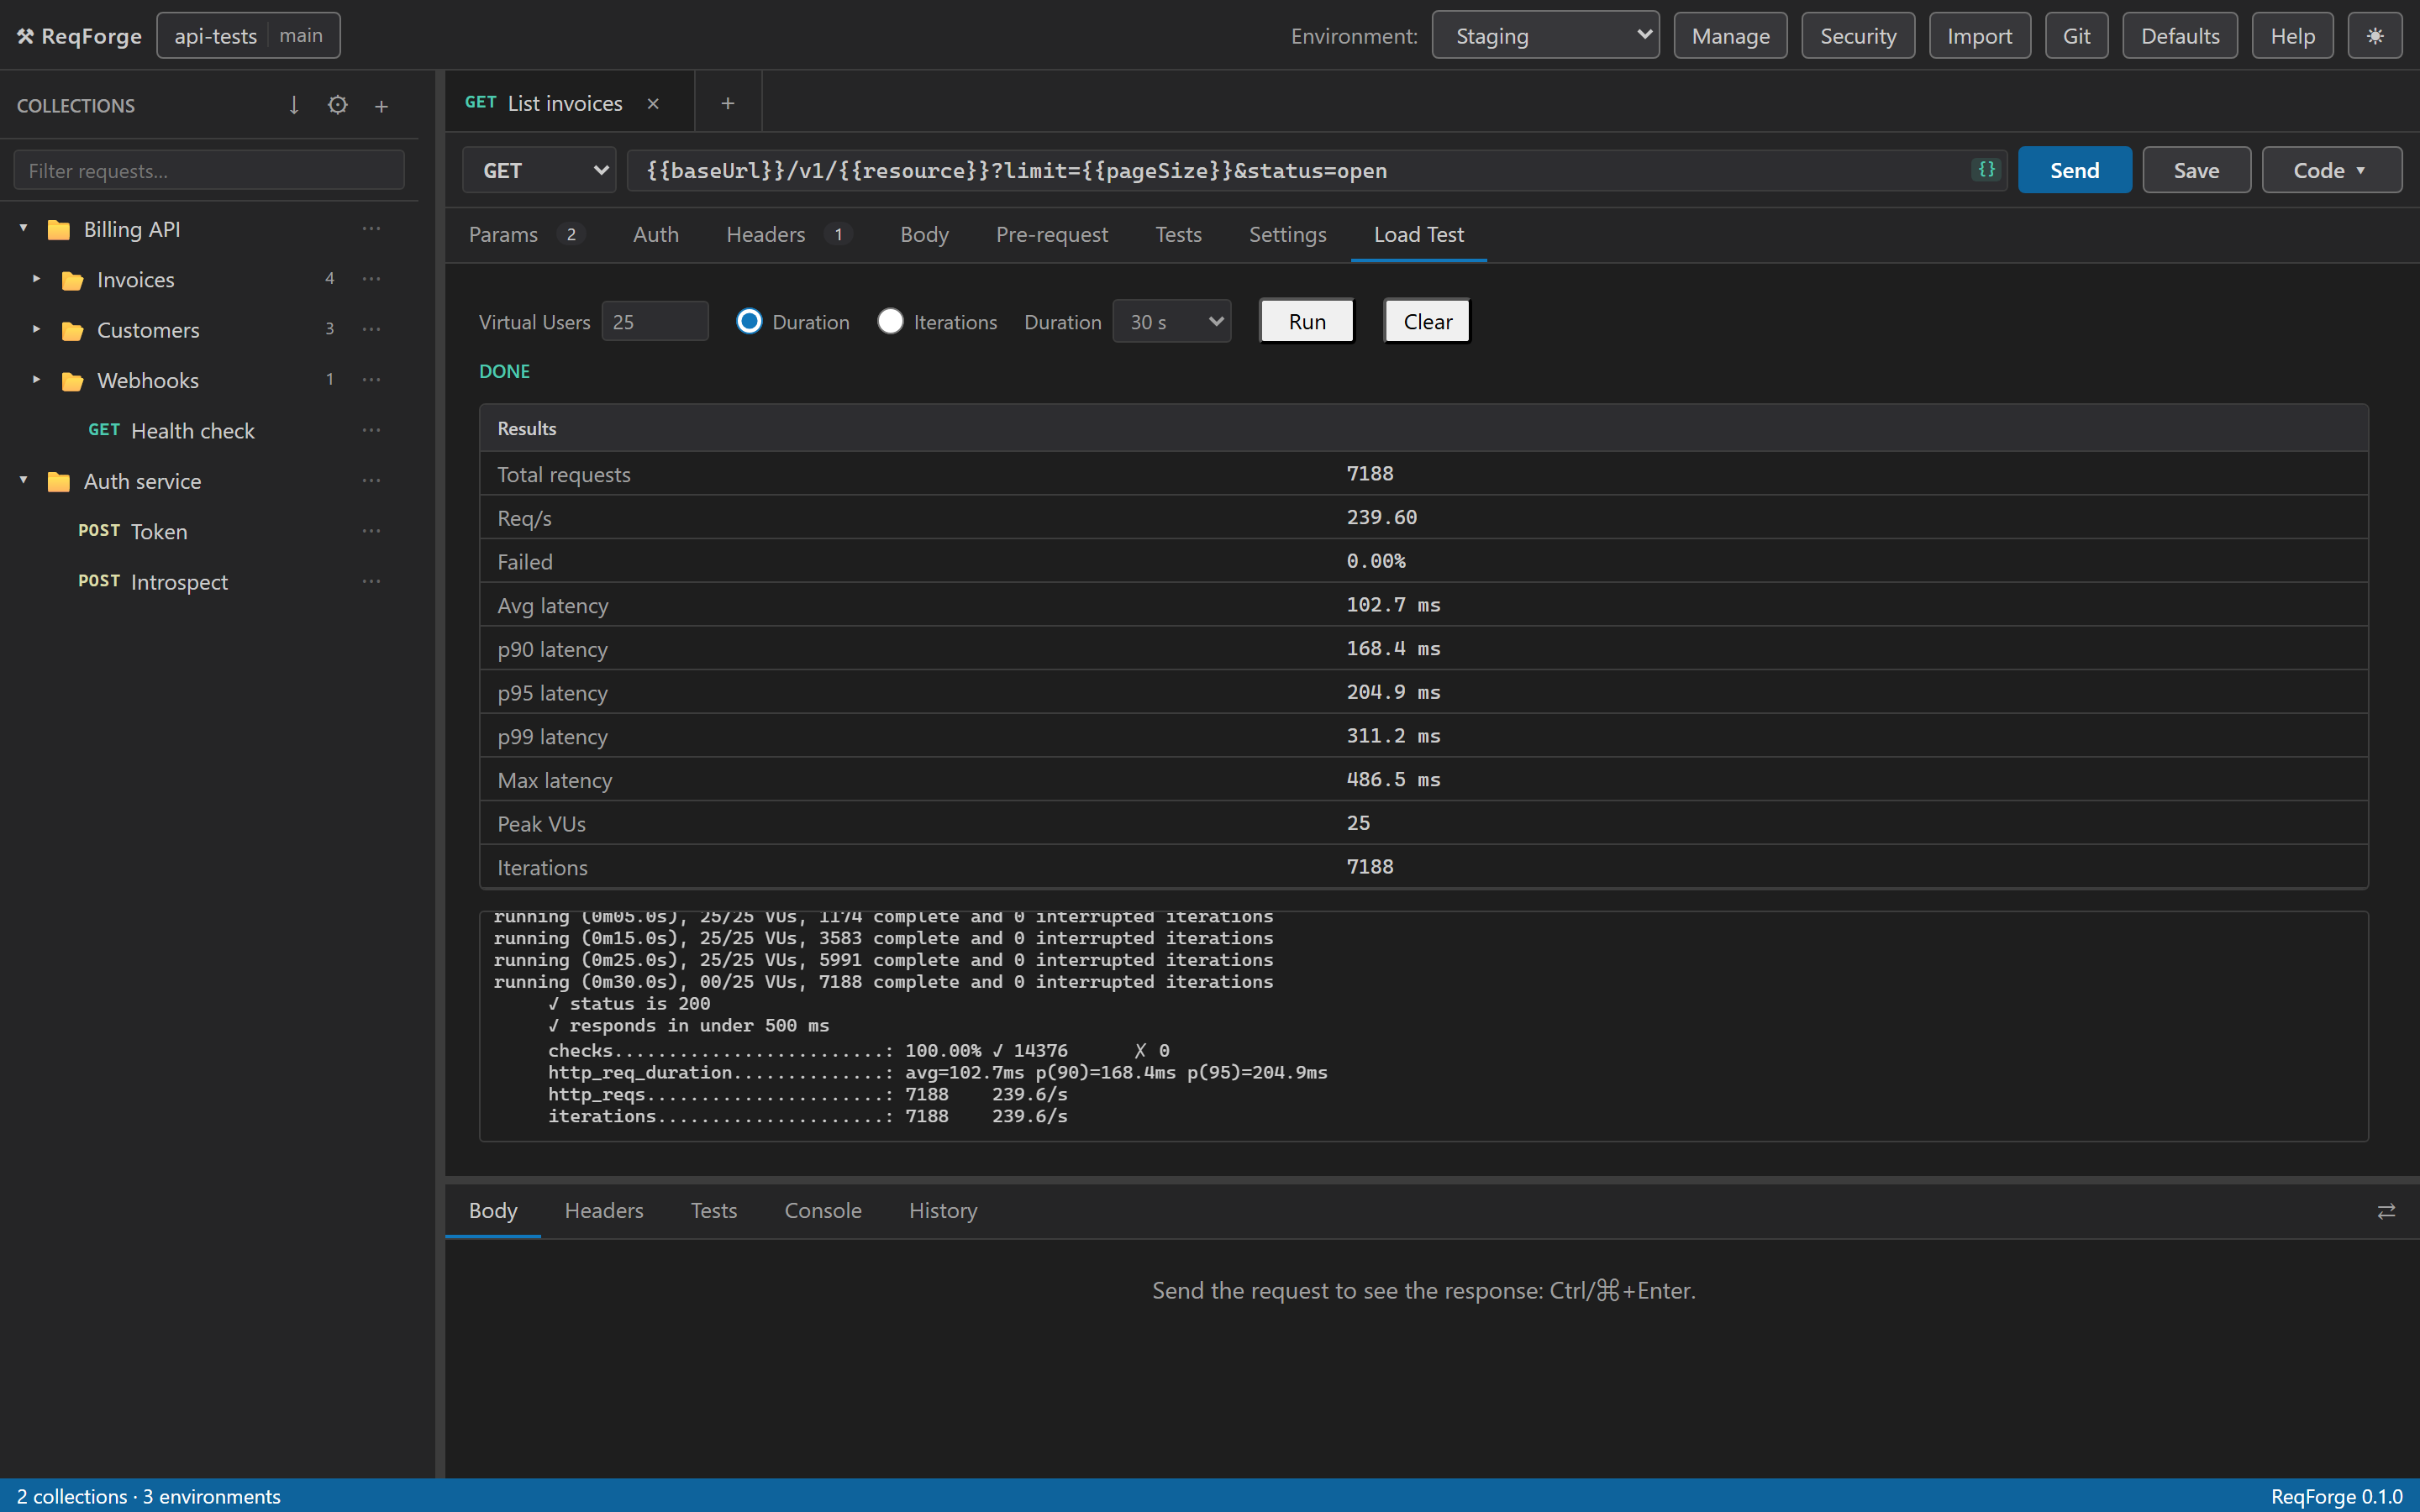
The Load Test tab integrates with
k6, an open-source load testing tool. It
turns the request you have open into a script and runs it on your own
machine. Choose the number of virtual users, then either a duration
(30s, 2m) or a fixed iteration count. The
tool's output streams while the test runs; at the end you get average,
p90, p95, p99 and max latency, total requests, request rate, failure
rate and peak VUs.
k6 is a separate, third-party tool and must be installed. Restart ReqForge after installing it; the tab says so if it cannot find it.
brew install k6          # macOS
winget install k6        # Windows
snap install k6          # Linux
Security scanning
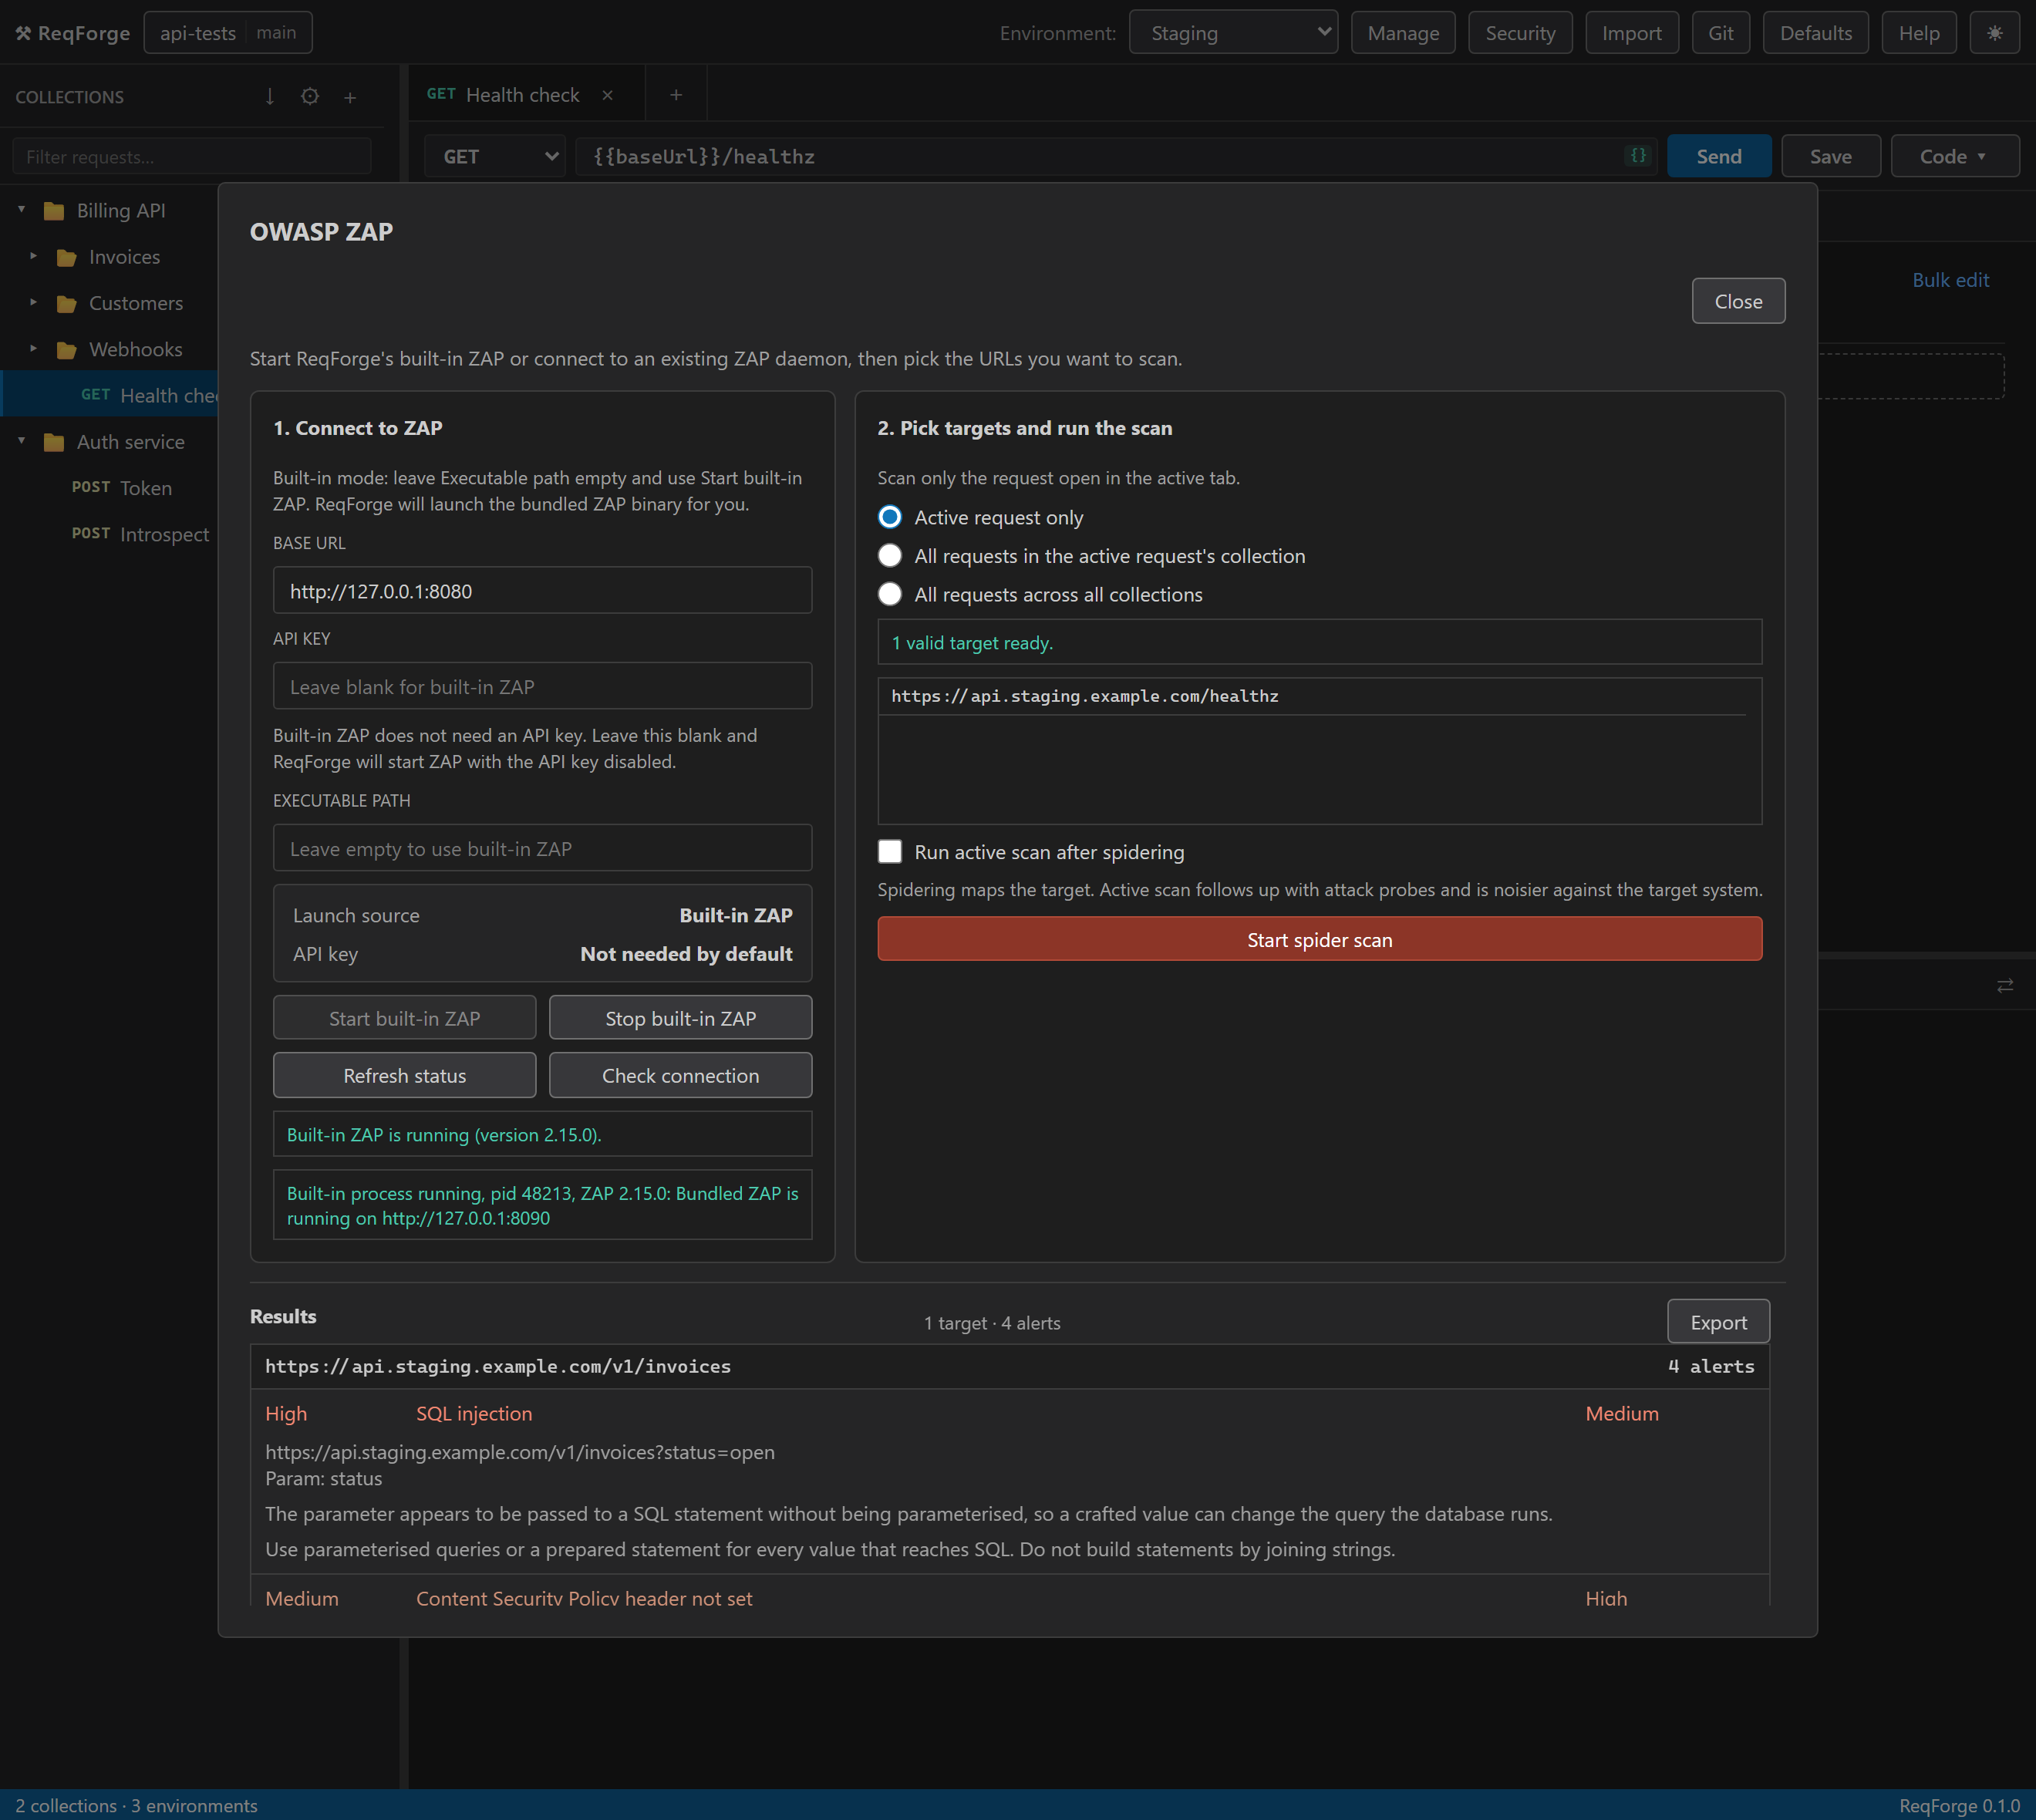
Security in the top bar integrates with
ZAP, an open-source web
application security scanner, and points it at your APIs. Like k6,
ZAP is a separate install: ReqForge finds the one on your machine,
starts it as a daemon for you and stops it again, or talks to a
daemon you already run. Set an executable path only to use a
different install from the one it found.
ZAP must be installed. The dialog says so, with these commands, when
it cannot find one; press Refresh status after
installing. ZAP needs a Java runtime, which its macOS and Windows
installers include.
brew install --cask zap          # macOS
winget install ZAP.ZAP           # Windows
snap install zaproxy --classic   # Linux
Scan the active request, every request in the current collection, or
every request in every collection. Targets are resolved URLs, so
{{variables}} are substituted first; anything still
unresolved or not http(s) is skipped and counted so you know
it was left out. Spidering always runs; the active scan is opt-in,
because it sends attack traffic. Findings are grouped by risk with
description, evidence and a suggested fix, and export as JSON.
Workspaces and git
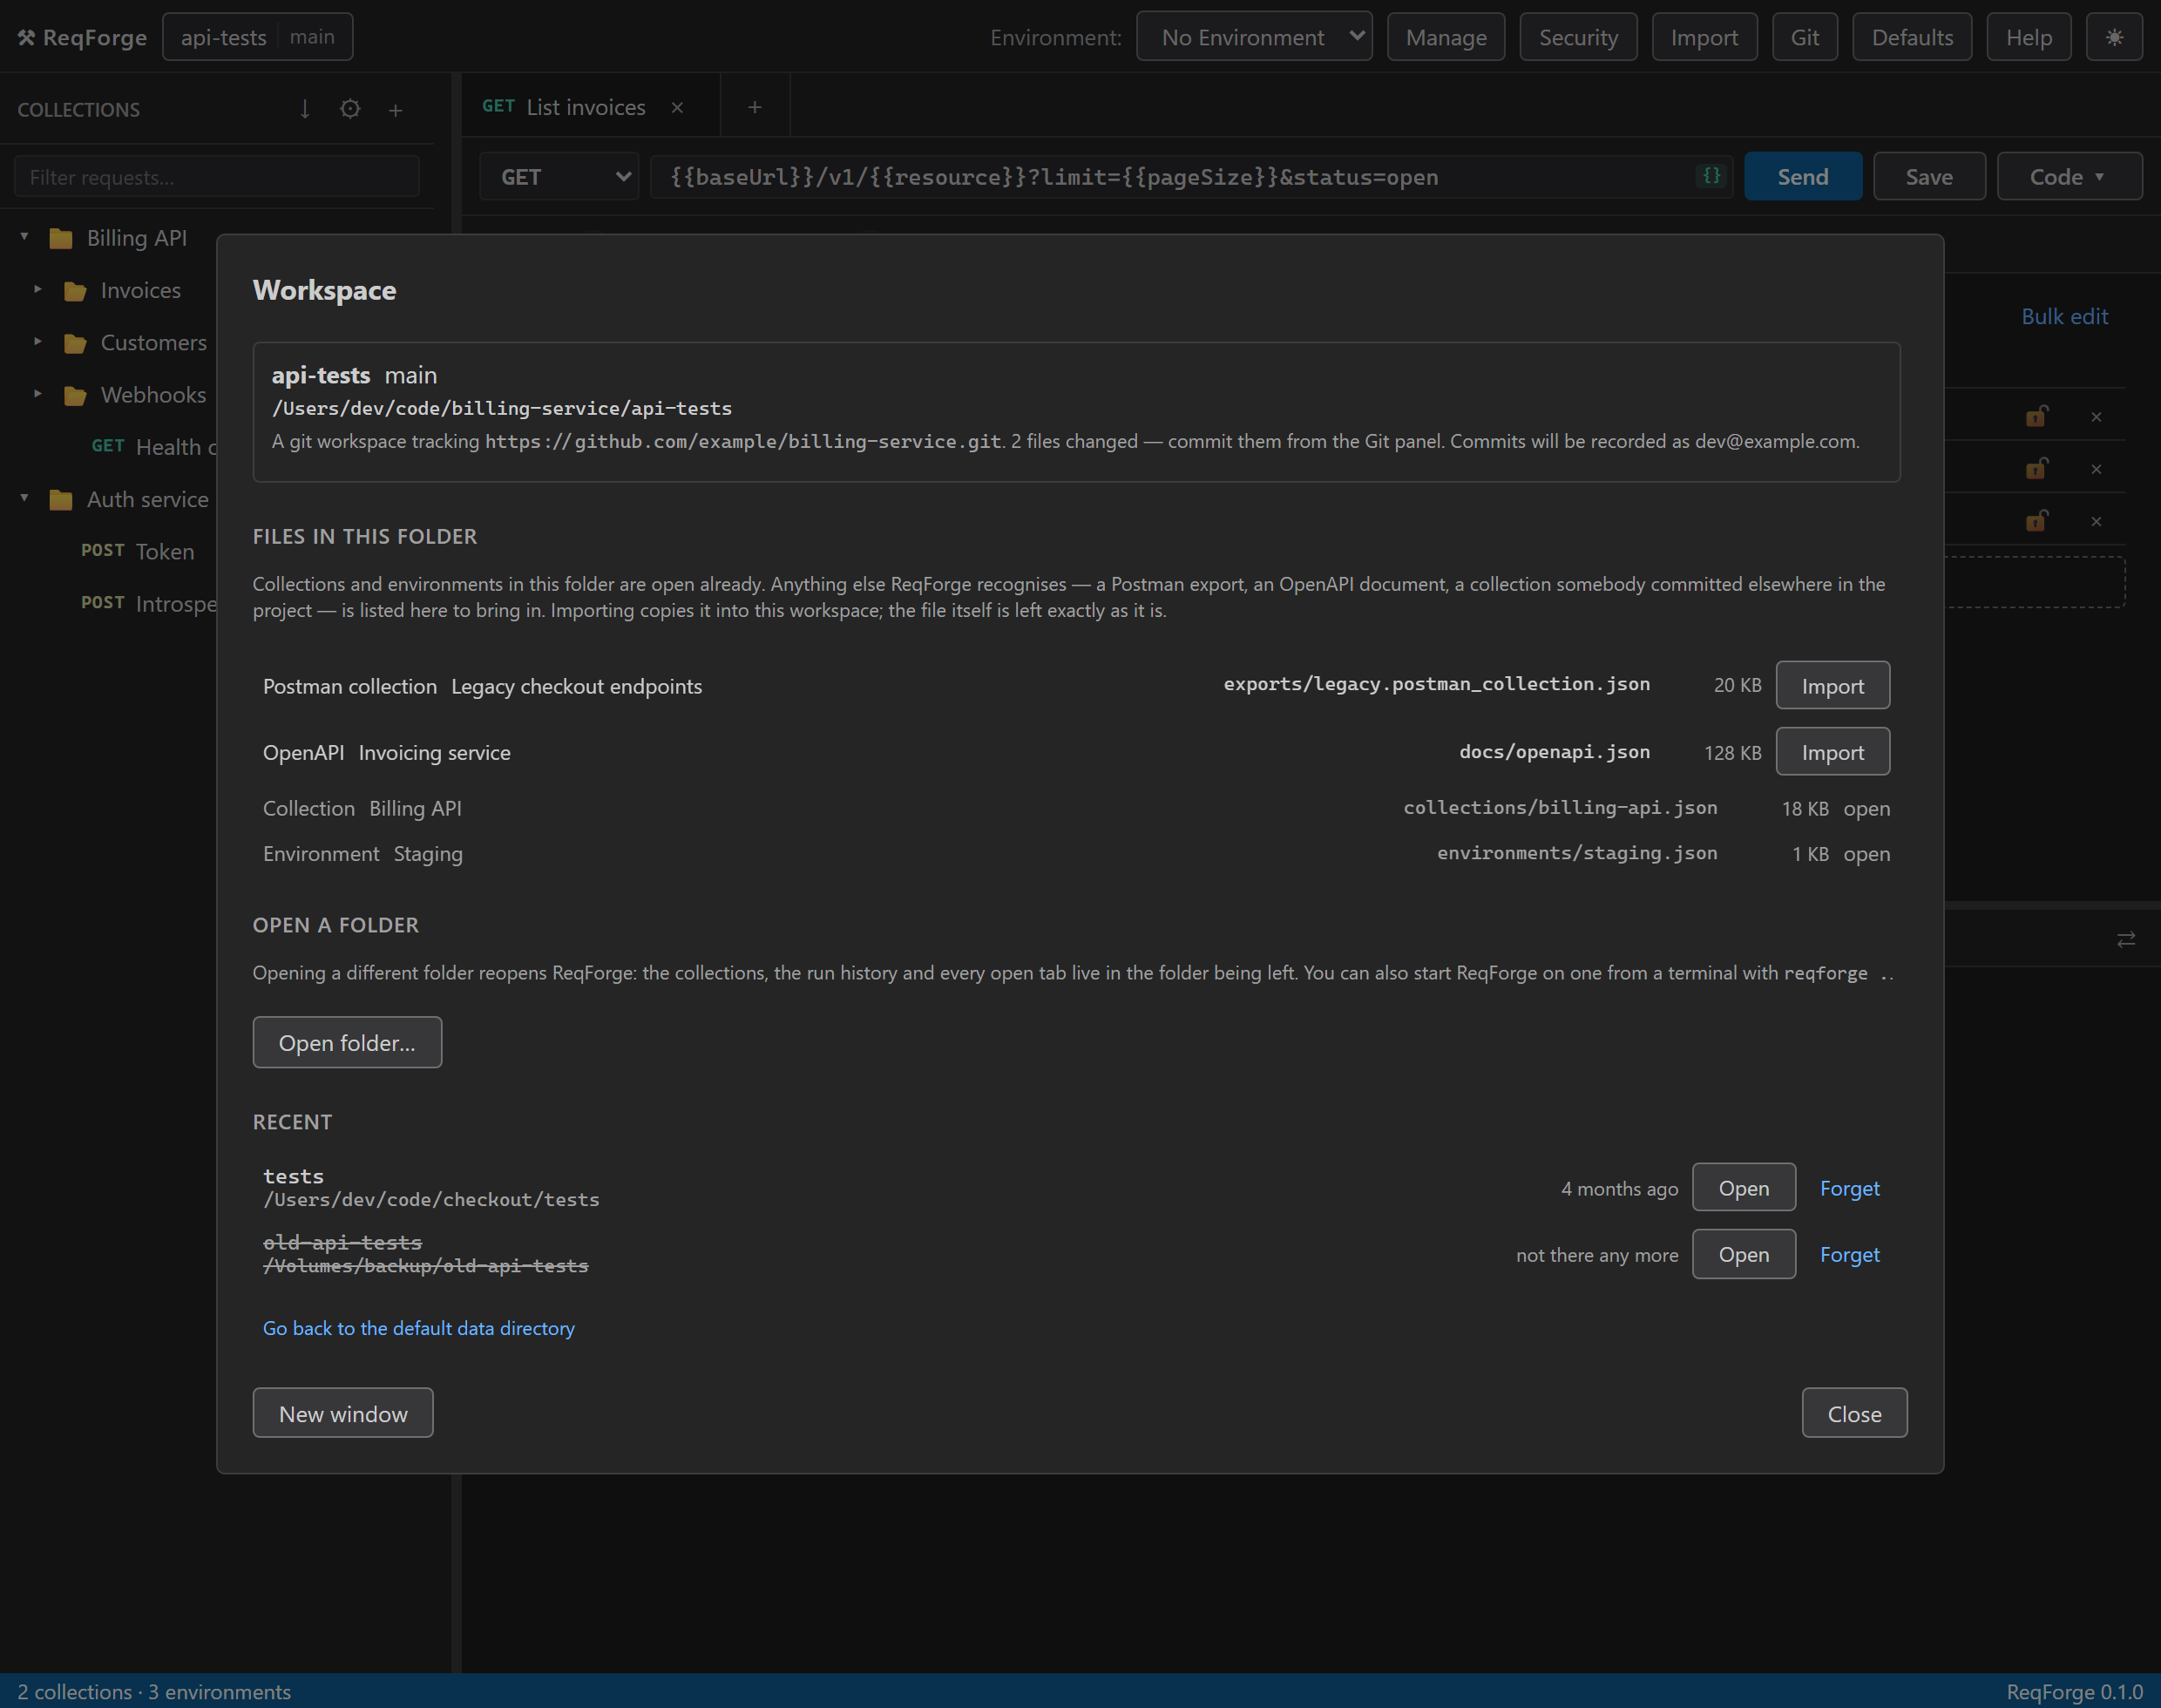
A workspace is a folder holding collections/,
environments/ and settings.json. ReqForge works
out of one at a time; until you open another, that is the default data
directory.
- Open any folder from the workspace chip in the top-left, or start on one with
reqforge . - ReqForge lists the API files it finds there (its own, Postman exports, OpenAPI documents) and imports them on a press.
- More than one window on the same folder, and tabs you can drag out into their own window.
- Opening a different folder reopens the app, because the collections, history and open tabs all live in the folder being left.
Because a collection is one JSON file, git tracks it with no translation.
Press Git in the header to clone a repository as a
workspace, then commit, branch, pull and push from inside the app.
libgit2 is bundled, so this works whether or not git is
installed.
Changesshows the branch, how far ahead or behind the remote you are, and every file that differs from the last commit.Branchesswitches or creates. Switching is refused while you have uncommitted changes, because the working tree is your collections.Pullfast-forwards only. If both sides have moved it says so rather than attempting a merge.- Access tokens go into your operating system's keychain, keyed by host, and never into a collection or a settings file.
- Run history and logs are excluded by a
.gitignorewritten on clone: they are this machine's cache, and full of response bodies.
Import and export
Import in the top bar takes four formats, pasted as text or
picked as a file.
| Format | Becomes |
|---|---|
| Postman Collection v2.1 | A new collection, folders and all |
| Postman Environment | A new environment |
| cURL command | A single request in the collection you choose |
| OpenAPI 3.x (JSON) |
Paths become requests in document order, grouped by tag. The first
server becomes a {{baseUrl}} variable; query and header
parameters and JSON body examples come across; each
{path} parameter is seeded as an empty collection
variable
|
Export with on a collection row:
Postman v2.1 JSON that other tools, and ReqForge's own CLI, can read. If
the collection holds credentials, ReqForge asks before writing them out.
Choosing to blank them keeps every key, header and auth type with the
credential half empty and marks the filename .redacted.
Where your data lives
| Platform | Path |
|---|---|
| Windows | %APPDATA%\com.adrian.reqforge |
| macOS | ~/Library/Application Support/com.adrian.reqforge |
| Linux | ~/.local/share/com.adrian.reqforge |
<data-dir>/
  collections/<id>.json      one file per collection
  environments/<id>.json     one file per environment
  settings.json              app-wide defaults, globals and headers
  history/                   per-request run history, pruned automatically
  logs/reqforge.log          rotating at 5 MB, keeping three previous files
Back it up by copying the folder. Open ReqForge on another folder and all of that comes from there instead.
| Variable | Effect |
|---|---|
REQFORGE_DATA_DIR | Use this directory instead of the platform default |
REQFORGE_LOG | Log level: error, warn, info (default), debug, trace |
RUST_BACKTRACE=1 | Add backtraces to ordinary errors |
REQFORGE_LICENCE_TOKEN | The licence reqforge-cli run and diagnose use. Unset, they use the app's activation on this machine. The app ignores it and reads its own |
The licence is not in that folder. It lives in the operating system's keychain (Keychain Access on macOS, Credential Manager on Windows, your desktop's secret store on Linux), and it is tied to the machine, so copying the data directory somewhere else carries your work but not your seat. Activate on the new machine instead.
Cookies are handled for you: a Set-Cookie is stored and
sent back to the same site, and live in memory only, so quitting forgets
them. Defaults → Cookies lists what is stored and lets
you forget one or all of them.
Keyboard shortcuts
| Keys | Action |
|---|---|
| Ctrl/⌘+Enter | Send the active request |
| Ctrl/⌘+S | Save the active request |
| Ctrl/⌘+T | New request |
| Ctrl/⌘+W | Close the active tab |
| Ctrl/⌘+K | Jump to the sidebar filter |
| Ctrl/⌘+⇧+N | Open another window on the same folder |
| Ctrl/⌘+⇧+O | Open the workspace panel |
| F1 or Ctrl/⌘+/ | Open the user guide |
| Esc | Close a dialog, or clear the sidebar filter |
| ↑ ↓ | Sidebar: move between rows |
| → ← | Sidebar: open a folder, or close it and step back out |
| ← → | Tab strip: previous or next tab |
| Enter | Param and header tables: key → value → next row |
The collection tree and the tab strip are each a single tab stop, implementing the WAI-ARIA tree and tablist patterns, so Tab carries on rather than walking you through every row.
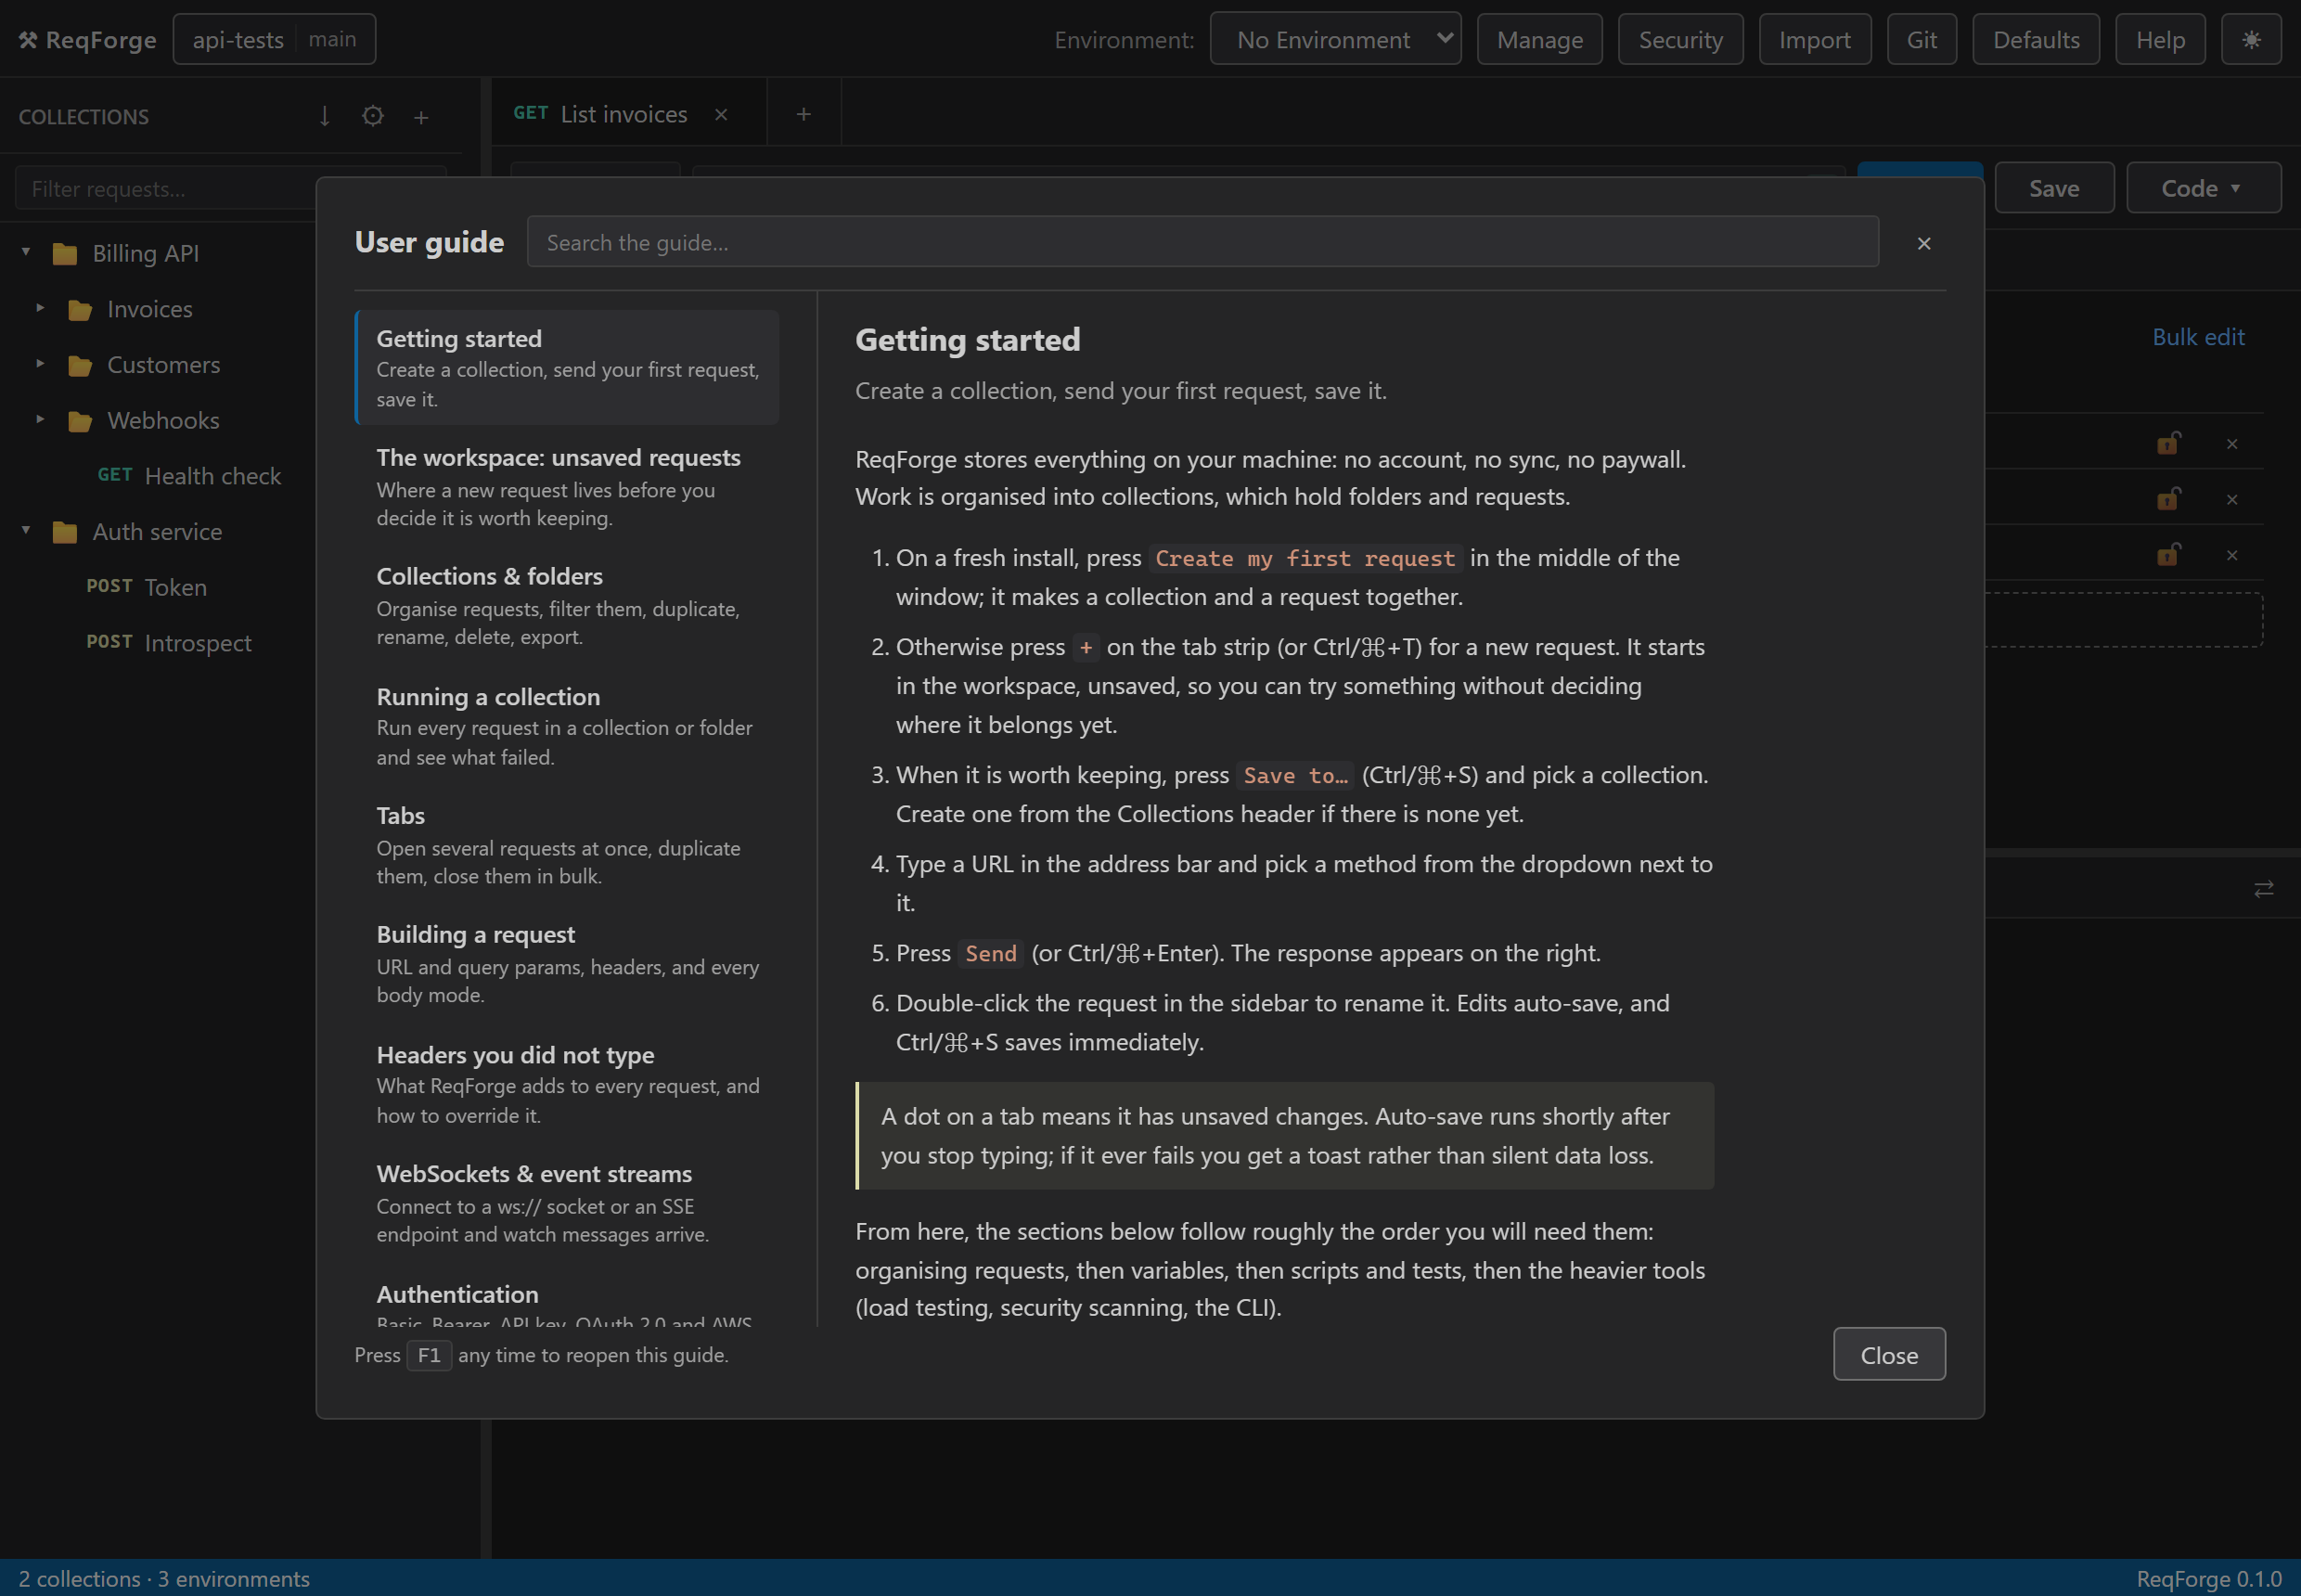
Troubleshooting
| Symptom | Cause and fix |
|---|---|
| ReqForge is not activated on this machine | No licence is stored here yet. Defaults → Licence, then activate with the work email your seat was given to |
| Sending comes back with a licence message instead of a response | The licence has lapsed, the seat was removed, or it has been offline too long. The banner across the top says which, and Check again on it refreshes. Reading, editing and exporting carry on regardless |
| Offline: ReqForge locks in n days | The daily check has not got through. Any moment of network clears it; see running it offline |
reqforge-cli: no licence |
run and diagnose need the app activated on this machine, or REQFORGE_LICENCE_TOKEN. list, logs and doctor work without either |
| That seat is already active on another machine | One seat, one machine. Deactivate the other one from Defaults → Licence, or ask us to release it |
| A variable is not substituting | Hover the field. The preview says whether it is defined and which scope would supply it |
| A request fails with a TLS error | Check Verify TLS in Settings, remembering it may be inherited from a folder or collection |
| The Load Test tab says k6 is missing | Install k6 and restart ReqForge |
| The Security dialog says ZAP is not found | Install ZAP and press Refresh status, or set the executable path to where it is |
| A request is authenticated as the wrong user | Defaults → Cookies. Forget the stale one |
| The build warns about an unknown publisher | Code signing is not configured yet |
| Anything else | Defaults → Diagnostics, or reqforge-cli logs --tail 100. Raise the detail with REQFORGE_LOG=debug |
Getting the builds
Every platform, every release, with the headless CLI beside the installers. Download the one for your machine, install it, open it, and activate with the work email your seat is on. The app checks that page once a day and offers each new version from inside Defaults → Diagnostics; there is nothing to reinstall by hand after the first time.
| Platform | Download | Also on the page |
|---|---|---|
| macOS | .dmg, one build for Apple silicon and Intel | reqforge-cli |
| Windows | .exe installer | reqforge-cli.exe |
| Linux | .deb or .rpm | reqforge-cli |
The Windows and macOS builds are not code-signed yet, so SmartScreen and Gatekeeper warn the first time you run one. Nothing is wrong, and install shows exactly what to click. If your organisation blocks unsigned software, tell us and we will say when signed builds are ready.
A trial is opened in the console, and the builds are on the releases page above; the seat is what makes them run.